|
Executive Editor

Join Date: Aug 2006
Posts: 29,160
|
|
 Building a Monster Media Machine Using Shuttle's SD39P2 XPC
Product Category: Barebones computer (XPC)Where to Buy: NewEggPrice: $371.71 USDSystem Requirements: The SD39P2 is a case, motherboard, and power supply. You need to add a CPU, RAM, hard drive, optical drive, and video card.Specifications: 325(L) x 210(W) x 220(H) mm in size. 400 watt power supply, Intel 975X + ICH7R chipset, 4 x 240 pin DDR2 DIMM Slots, 2GB per DIMM (Max 8GB), Dual Channel DDR2 533/667/800 with ECC supported. Full specifications on the Shuttle product page.Pros: - Superb industrial design - it looks fantastic;
- Four slots for RAM, up to 8 GB supported;
- Eight USB ports, three hard drive bays, one e-SATA port - it's loaded.
Cons: - No memory card reader included;
- RAID setup a frustrating mess;
- Not exactly quiet compared to some computers.
Summary: My goal was to create a powerful small form-factor media editing machine, primarily used in editing RAW photos and high-definition video footage. I used the latest and greatest Shuttle - the SD39P2 XPC - when I started this project, combined it with the best that Intel, Kingston, and Western Digital had to offer, and ended up with a screamer of a machine. Building a Computer for ReviewEvery time I start a project to build a computer for an article, I always face the same challenge: getting the best parts I can at the right time, and getting the machine assembled, benchmarked, and throughly tested - all before the parts I'm using become obsolete. Let me tell you, it's not as easy as it sounds! It's definitely not as straightforward as unpacking a new gadget or piece of software and testing it. I started this project around five months ago, and went through all sorts of setbacks - delayed shipping, a defective product, and software glitches galore (and, if I'm honest with myself, motivation problems with this article due to those delays). Because of that, some of the hardware in this article is already outdated, replaced by newer versions. The goal of this article is to not only review Shuttle's SD39P2 XPC, but also to describe why I picked the parts that I did, how they performed, and what I learned about building a high-performance small form factor computer. The Lowdown on the Shuttle SD39P2I have a long history of using Shuttle XPC computers, so I'll admit that I'm biased right off the bat: I really like their hardware, design, and quality. When I wanted to start this project, I knew it would be sitting on a shelf above my work desk, so a small form-factor computer was a must. I also knew that I wanted to build something as cutting-edge as possible, so I contacted Shuttle to ask them for the newest, fastest, most bad-ass XPC possible (this was back in March). They sent me the brand new (at the time) SD39P2. 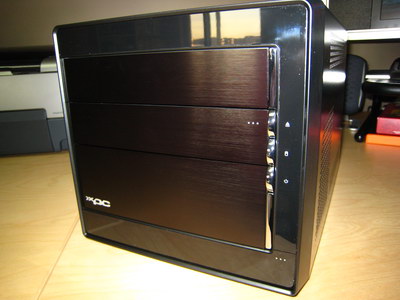
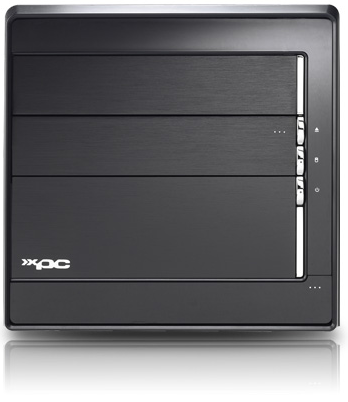
Figure 1: The Shuttle SD39P2, up close and personal - it looks fantastic! 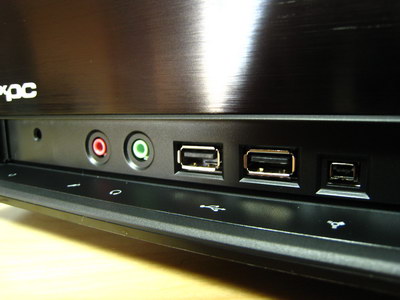
Figure 2: Behind the pop-down panel, we have (from left to right), a recessed reset button that's a complete pain to get at, a microphone jack, headphone jack, two USB 2.0 ports, and a 4-pin Firewire connection. 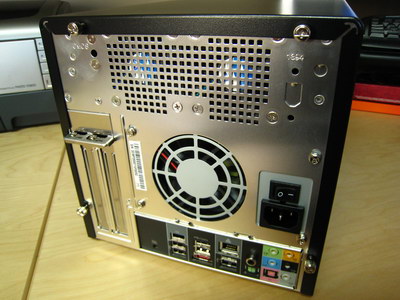
Figure 3: The SD39P2 from the back - two slots for expansion cards (one x16 PCI Express slot, and one PCI slot). Notice all the perforations in the case for air flow. This was the first XPC from Shuttle to support the Intel Core 2 Quad processor, along with supporting the Core 2 Extreme processor, Core 2 Duo processor, Pentium 4 processor and Pentium D processor (all Socket 775 of course). It uses the Intel 975X + ICH7R chipset, has enough space for four RAM sticks running at DDR2 speeds of 533/667/800, and maxes out at 8 GB of RAM. Audio duties are handled by an on-board Realtek ALC888, 7.1 channel High Definition Audio chip with an S/PDIF In/Out port. I would have preferred to see an on-board Soundblaster solution, or even better on a riser card, but I don't do much serious audio work so I'm ok with on-board audio. The Broadcom BCM5789 supplies the gigabit ethernet support, and Firewire 400 is supported (sorry, no 800 here). Intel Matrix Storage Technology means on-board RAID, which is perfect because this unit also supports up to three SATA hard drives. The motherboard supports a whack of different connections, so I'll just do a copy/paste here from the Shuttle site: - (3) 3.0Gb/s bandwidth SATA II
- (1) 3.0Gb/s bandwidth eSATA
- (1) Ultra DMA/100 IDE channel
- ONBOARD CONNECTORS (3) SATA connector
- (1) ATA100 bus IDE connector
- (1) Floppy connector
- (2) 1x5pin USB2.0 header
- ATX main power connector
- (1) ATX 12V power connector
- (3) set 4pin fan connector
- (1) set 3pin fan connector
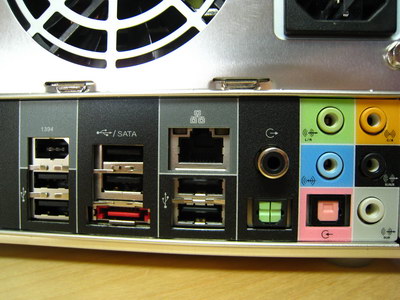
Figure 4: A close up of the back ports on the SD39P2. From left to right, we have a 6-pin Firewire 400 port, two USB ports, then two more USB ports and an e-SATA port (external SATA), the ethernet port, two more USB ports, digital optical out (either RCA-style plug or the square optical), then the standard in/out audio ports, along with a digital optical input. 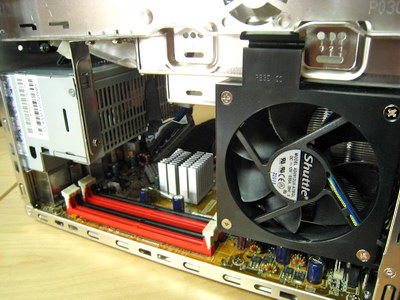 Figure 5: A close-up of the motherboard - the big fan on the right draws heat off the passive heatsink over the CPU. 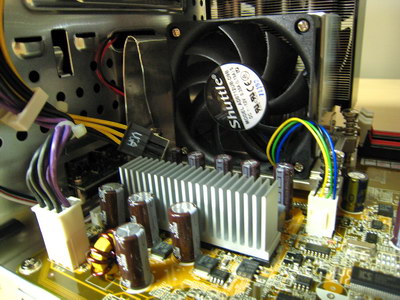
Figure 6: Another motherboard close up, this time showing the other side of the fan. Putting It All TogetherEven though I've assembled more than half a dozen Shuttle XPC units, I always follow the instructions because every Shuttle is different. The SD39P2 is about as easy to assemble as any bare-bones machine can be. As long as you follow the instructions, you'll get it put together without any problems. Before you can put anything in the Shuttle, however, you need to take it all apart. Thankfully, that's easy enough with the removal of a few screws. The short version is that after removing the top hard drive cages, you take out the entire main assembly that holds the optical drive and the other hard drive bay. The instructions guide you through installing the RAM and CPU (thermal paste is included), then the optical drive and hard drives. The optical drive is hidden behind a stealth door that, while it looks good, may give you trouble depending on what make and model of optical drive you put in it. This time, I had no problem at all - the DVD burner I put in it was a perfect fit and after a quick alignment of the pressure pad (the part that makes contact with the optical drive eject button) everything was great. The Shuttle I had before this one had an identical system and gave me a lot of trouble - it's not a serious problem, but it's something to be aware of. 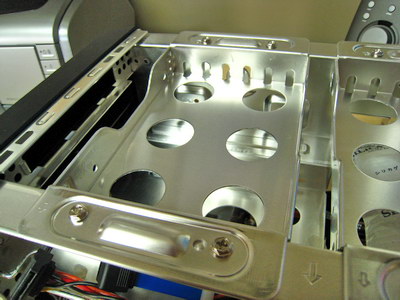
Figure 7: The top two hard drive bays have to be removed before you can access everything below. 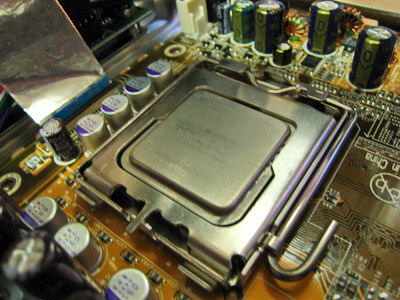
Figure 8: That, dear readers, is a high-performance piece of silicon: an Intel Core 2 Extreme processor, the X6800 to be precise, boasting 2.93GHz speed and 4MB Cache. More on this below. 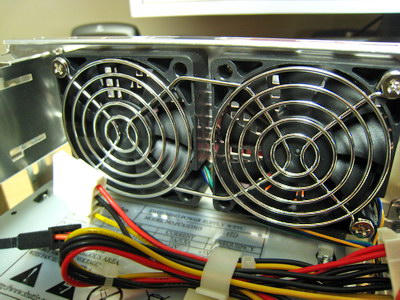 Figure 9: The dual fans at the top back of the SD39P2 do a good job of expelling hot air, especially if you have the two hard drive bays at the top in use. 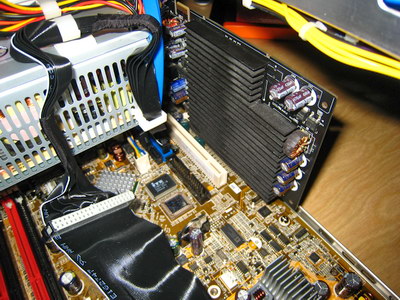 Figure 10: A view of the inside-rear of the SD39P2. The PCI Express slot has a video card in it (more on that below). 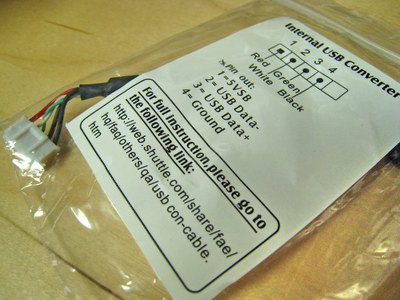
Figure 11: The most curious thing in the box - an "Internal USB Converter". I tried the URL listed on the package several times, including a few variations, and was never ever to find the "full instruction" that the package references. It seems I didn't need it, whatever it was. I had some trouble with the software portion of the RAID setup, which you'll read about below. The Guts of the MonsterAs I explained at the beginning of this article, I wanted this computer to be used primarily for one thing: media editing. I didn't care about gaming performance, TV recording, or anything else. Every part I picked was geared toward the goal of editing RAW photos and video footage (both SD and HD) as fast as possible. Here's what I put in it and why. PROCESSOR: Intel Core 2 Extreme X6800Intel Canada was generous enough to send me their flagship processor at the time: the Intel Core 2 Extreme X6800. When they sent it to me, the Intel Core 2 Quad CPU was just being sampled to some Web sites, and even though I desperately wanted one for this machine because it supported it, there was just no supply (and, hey, Digital Media Thoughts is no Tom's Hardware Guide - I know my place in the food chain). This delectable CPU has a lot of muscle: 2.93 Ghz clock speed, two cores, a 1066 MHz front-side bus, and 4 MB of L2 cache. It also supports all of the Intel technologies such as Intel Virtualization Technology, Enhanced Intel SpeedStep Technology, Intel Execute Disable Bit, and Intel 64 architecture. 
(The CPU doesn't actually look exactly like that, though that would be cool of it did!) Most of those features don't have a direct impact on my day to day use of the CPU, but since being "green" is currently the trendy thing to do, here's something I found interesting: because my APC Back-UPS XS 1300 has the handy ability to measure the electrical draw of anything connected to it (in watts), I was able to see the Enhanced Intel SpeedStep Technology in action first hand. The only two things connected to the UPS are the SD39P2 and my Dell 24" widescreen monitor. With the system turned on and idling (no heavy CPU tasks running), and the monitor turned off, it was using only 65 watts of power. The CPU was scaled back to 1600 mhz (as measured by CPU-Z). With the monitor turned on, usage shot to 139 watts - that's right, my 24" LCD monitor uses more power than the whole SD39P2 when idling! No wonder the monitor puts out so much heat. Lastly, I wanted to measure power draw at full load, so I dropped a DV-AVI file into Windows Movie Maker and set it to render it as a 720p file - the CPU was firing at 100% usage, 2933 mhz blazing - and power usage jumped up to 191 watts. So doing some quick math, that's 52 watts of power between the CPU at idle (1600 mhz) and the CPU at full gas (2933 mhz). It would be interesting to see what would happen if Intel throttled it back even further - you certainly don't need 1600 mhz of CPU power to type an email message. This is by far the most powerful CPU I've ever tested, and as you'll see later in the benchmarks section, it absolutely shreds through data. MEMORY: Kingston 800 mhz DDR2 ValueRAM, 3 GB TotalKingston sent me 4 GB of their DDR2 800 mhz RAM - four 1 GB sticks in total. I also had a few sticks of their DDR2 800mhz 512 MB RAM from another project. When I was first deciding on the parts for this system, I was aiming for 4 GB even though I'd read a lot of confusing reports about how much RAM Windows Vista 32-bit really supported. If you look at the Microsoft marketing materials, and even the responses I received from a Microsoft contact I asked, everything points to 4 GB of RAM being supported. If you want to go above that, you need the 64-bit Version of Windows Vista or Windows XP. Yet I read in forum after forum about people installing 4 GB of RAM and only seeing between 3 GB and 3.5 GB of it. How could it vary so much? The complexities of memory address space are above my head, but the simplest explanation I could figure out is that the amount of RAM you can access above 3 GB depends on the motherboard, the BIOS, and the number of devices you have installed. This Microsoft article explains it all in greater detail, but I confess to not being able to understand most of it. 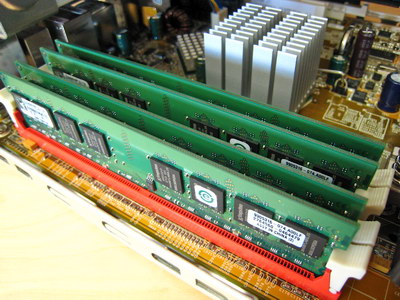
Figure 12: The Kingston RAM - 2 x 1 GB sticks, 2 x 512 MB sticks. Good thing there's four slots! When I put the 4 GB of RAM into the SD39P2, I was able to see 3.5 GB worth - so I was missing out on around 500 MB of RAM. I installed the 64-bit version of Windows Vista just for fun, and it was able to see all 4 GB of RAM, but 64-bit computing is still a massive headache due to driver issues so I switched back to 32-bit Vista Ultimate and 3.5 GB of RAM. That's a lot better than 2 GB mind you, but I felt I could optimize things a bit better. I had four Kingston 512 MB RAM sticks from my other Intel CPU review, and since the SD39P2 had four RAM slots, it gave me the flexibility to give each PC 3 GB of RAM: 2 x 1 GB sticks, 2 x 512 MB sticks. It's still in dual-channel mode for maximum performance, and since 3 GB is the practical usable limit for a machine running a 32 bit version of Windows without losing RAM, it seems like a reasonable compromise. The fact that Shuttle put four RAM slots on the SD39P2 gave me an option other than 2 GB or 4 GB. The Guts of the Monster (...Continued)OPTICAL DRIVE: LG 18x DVD Dual-Layer BurnerBecause this was a media editing and authoring machine, my initial plan was to get a Blu-ray burner for it. I tend to be more of an HD-DVD guy myself, but if you need to burn a big high-definition project right now, Blu-ray is the only game in town. I contacted Plextor and asked for one of their PX-B900A Blu-ray burner drives. Their initial response was promising, but after waiting over a month and repeated emails going unanswered, I gave up and went out and bought a drive I knew I'd get good use out of: a cheap dual-layer DVD burner. Burning a Blu-ray disc would be more of an exercise in W?BIC! (Why? Because I Can!) than anything else. I know exactly one person with a PS3 where I live, and no one with a stand-alone Blu-ray player. 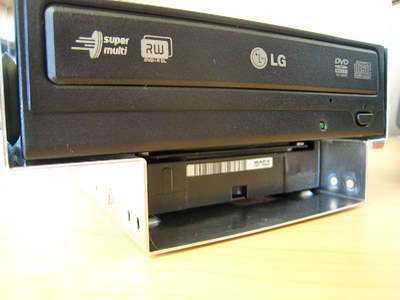
Figure 13: The optical drive. Nothing special! It's amazing how inexpensive DVD burners have become: you can pick up a 20x DVD burner with LightScribe abilities for just a bit over $30 USD. I can still remember paying over $500 for my first DVD burner, a Pioneer. At any rate, there's absolutely nothing special about this LG burner - other than the fact that the first one I bought was defective so I had to get a replacement. Quality control tends to drop as quickly as the price with most hardware. Moving right along... STORAGE: Western Digital Raptor (150 GB), Twin Western Digital RE2 Drives (500 GB each)My plan for storage on this system was fairly straightforward: I used the fast 10,000 RPM Raptor drive as the applications drive, running Windows Vista and storing all the day to day applications and data. 150 GB is enough space for that purpose, and the Raptor drive is still the fastest drive around. The two Western Digital RE2 drives, 500 GB each, would be put together into a RAID 1 array (meaning each piece of data would be written to each drive, offering redundancy). 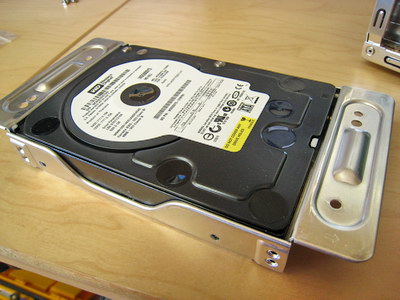
Figure 14: One of the Western Digital RE2 drives. 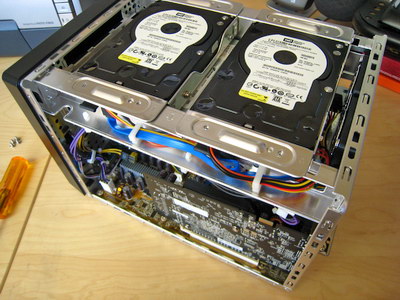 Figure 15: Both of the RE2 drives are in the top drive bays - the Raptor drive is in the drive cage below the optical drive (not shown) - you can see it in figure 13. Why RAID 1 for redundancy and not RAID 0 for speed? When you're working with large media files - especially video - it becomes a great challenge to back them up. Once you've finished the project and have your final files, you'll typically end up with storage requirements 1/10th of what you started with. Before you get to that point, however, you're in the stage where you have buckets of raw data. It's easy enough to back up 4 GB of RAW images, but what about 200 GB of raw HD video footage? I wasn't using this computer for final-form media storage - it was the editing workstation for the raw footage and photos. The final results would be stored on my Media Center computer or my Windows Home Server. An additional benefit of having the 500 GB array be used for nothing but media storage is that it's simple to format and prep for video capture - capturing to a empty drive gives you great results. When I'm ready to start a new project, I wipe the RAID array and start the capture. Getting the array configured was another story...keep reading below. VIDEO CARD: XFX 7600GSRemember when I said above that I didn't care about gaming performance? That's true - I care far more about having the quietest computer I can manage, and since video card manufacturers don't seem to grasp that silence is golden, I opted for a passively cooled card. XFX didn't respond to my emails requesting a card for review, so I just went out and ordered one of their 256 MB GeForce 7600GS cards myself. At one point I tried putting a XFX 7950 GT in there, but the SD39P2 couldn't handle the massive heat sink fans. 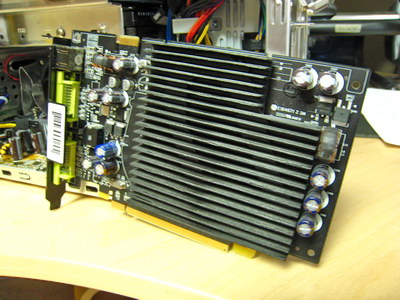
Figure 16: Silent and fast enough for my needs. Steps are being made to harness the power of the GPU on a video card to render video and assist the CPU, but we're still a few years away from that becoming the norm (if ever). Until then, the goal for any video card in a media editing machine is to not make any noise and to keep up with the general 2D/3D use of the operating system. The 7600 GS card isn't particularly fast, but it does the job well and fully supports Vista's Aero Glass features. RAID is Still a HassleWhen I put the Shuttle SD39P2 together, I initially only connected the 150 GB Western Digital Raptor drive after Vista was installed, my plan was to connect the two 500 GB Western Digital RE2 drives, turn on the motherboard RAID, and create the 500 GB RAID 1 array. I tend to put machines together in their simplest configuration first, the build them up slowly with other hardware and software. What sounded simple in theory turned out to be frustrating in practice. Vista installed without a problem (once I got past the optical drive problems), but when I turned on the RAID controller via the BIOS, I ran into serious problems: the RAID array was set to be bootable, and there was no setting to change that. When Vista tried to boot, I got a blue screen of death with a STOP 0x00000007B error. I tried a few things, including changing the boot order of the drives, but nothing helped. I ended up phoning Shuttle tech support to ask if what I wanted to do was even possible. The tech assured me it was, and said I just needed to install the Intel Matrix Controller software inside Vista. I thought "OK, that sounds simple". 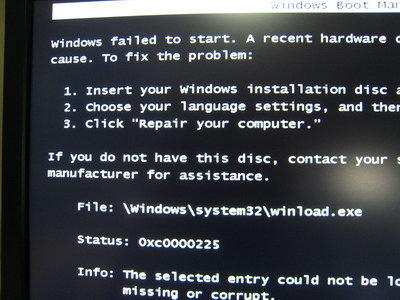
Figure 17: I lost count how many times I saw this screen. I should have known it wouldn't be: despite trying the version of the Intel Matrix software that came on the CD, and the version that Shuttle offered for download on their site, every install attempt resulted in an error in the software saying that my system "didn't meet the minimum system requirements". Both of the RE2 500 GB hard drives were installed, working, and formatted. I even tried two different versions of the Matrix software from Intel.com, but I saw the same error each time. I thought perhaps the problem was that the motherboard was set to SATA mode rather than RAID mode, and that the Intel software couldn't see the RAID controller, so I switched it to RAID mode but didn't have any of the drives in an array - meaning that there was no array to boot from, and that it should just boot from the single Raptor drive (which was in position zero). I thought for sure I had the problem solved, but a reboot gave me another blue screen of death with a STOP 0x00000007B error. Did I mention that the Shuttle's reset button is recessed and not accessible by a finger, forcing me to use a pen or paperclip each time I wanted to reset the machine? I tried booting in safe mode and when it got to a file called crcdisk.sys, the system crashed. I don't have a great deal of experience with RAID, but I do know that without the proper drivers, Windows can't see the connected hard drives. I was hoping this scenario would be improved with Vista, but it seems just as bad - well, perhaps not quite as bad, because now you can load drivers off a CD, in the Windows XP era it was floppy only. I booted from the Vista Ultimate DVD, selected the Repair option, and not surprisingly Vista couldn't see any install of the operating system. I selected load driver and after striking out on finding the right driver on the Shuttle driver CD (why wouldn't the RAID driver folders contain the same drivers as the floppy discs?), I was impressed that Vista's install routine could dynamically detect a USB floppy drive and load up drivers from it. The problem? There were two different driver files on the floppy disc, each listing no less than four different Intel hard drive controllers - and the SD39P2 specifications page didn't actually tell me what controller it uses. 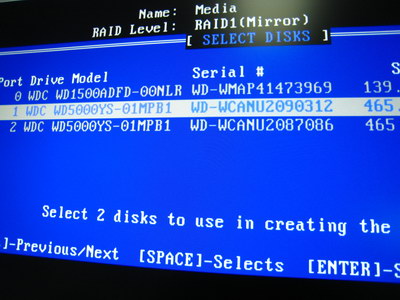
Figure 18: Finally, I got it working! Having no other choice, I phoned Shuttle tech support again. Their techs are really excellent, I've always found them to be helpful and very intelligent. They don't read from a database like a Dell drone, so when I explained what I was trying to do, he understood. After a few minutes of research, he found that the SD39P2 used the Intel 82801 GR RAID adaptor. Why this wasn't on the specifications page? He agreed it should have been. Unfortunately, even once I selected the proper driver, I wasn't able to rescue my install of Vista. I started over from scratch, this time with all three hard drives connected, and using the proper driver I was able to get Vista Ultimate installed and working perfectly - in fact, the install only took 18 minutes from the initial boot up to when I was staring at the Vista log-in screen after the performance benchmark. This machine is fast. Benchmarking the BeastAfter I installed Vista Ultimate, it was time for benchmarks! Benchmarks are ultimately meaningless numbers unless you have a point of comparison, so I thought the thing that made the most sense was to compare this new media machine to what I was using before for my photo and video editing: a Fujitsu N6220 laptop. This laptop was purchased in November 2005 with the goal of being my mobile photo and video editing workstation. I've been quite pleased with it, but I didn't end up going mobile with it as often as I thought I would - so it's been more of a desktop computer. It has 2 GB of RAM, two 7200 RPM 100 GB hard drives, and a single-core 1.86 Ghz Pentium M CPU. The PC Mark 2005 score for this laptop was 2156 PC Marks. By comparison, my other laptop (a small 10.6" screen Futjisu P7010), came in at 1096 PC Marks. How did the media machine benchmark without any overclocking? 7430 PC Marks. So I'm looking at an improvement of nearly 350% in overall performance. That's enough to make any geek giddy, so needless to say I was thrilled. Not surprisingly, the PC Mark 2005 CPU test was lop-sided: the Fujitsu N6620 showed up with a score of 3001, while the media machine spanked it with a score of 7106. The memory scores produced a similar result, with the Fujitsu N6220 giving a score of 2680 and the media machine screaming in at 5599. The all-important hard drive score on the Fujitsu N6220 was 3779, while the media machine came in at 6119 - the difference would have been even more extreme if I hadn't replaced the single 80 GB 5400 RPM hard drive in the Fujitsu (which is what came included) with those fast 7200 RPM drives. The hard drives gave a commanding performance as well - the 150 GB Western Digital Raptor dished out 127.1 MB/s burst speed, a random access time of 8.3 ms, an average speed of 75.1 MB/s, and CPU utilization of 4% (HD Tach Graph). The twin Western Digital RE2 500 GB drives in the RAID 1 array had a burst speed of 168 MB/s, random access time of 13.5 ms, an average speed of 61.5 MB/s, and CPU utilization of 3% (HD Tach Graph). These drives are incredibly fast, and the benchmarks show it. I ran the same DXO benchmark I did for the LG C1 laptop - taking 20 RAW images and processing them with the default settings - and measured the results. This test is almost entirely CPU and RAM dependant, so it's great test of the brute strength of a system. I've included the results from several of my recent computers so you can see what a huge difference the Intel Core 2 Extreme X6800 CPU makes. Fujitsu P7010D @ 1.2 Ghz (single core): 52 minutes LG C1 @ 1.2 Ghz (two cores): 21 minutes Fujitsu N6220 @ 1.86 Ghz (single core): 16 minutes Dell XPS M1330 @ 2.2 Ghz (two cores): 5 minutes 44 sec SD39P2 w/Core 2 Extreme @ 2.93 Ghz (two cores): 4 minutes 8 sec. Video encoding is still the single most intensive task you can do with your computer, so I tried a few tests. I ripped Lord of the Rings: The Fellowship of the Ring to a 720 x 480, 2025 kbps Divx file using CloneDVD Mobile. It was set to one pass deinterlace, and that process took 41 minutes and 15 seconds. CloneDVD Mobile uses mencoder which sadly isn't multi-core enabled - meaning that when CloneDVD Mobile was encoding, it was only using 100% on a single core. That meant the machine was still extremely responsive and fast, even with one core under full load, but I certainly wasn't encoding video as fast as I could be. Next I tried ripping the same DVD using Nero Recode, with the bit rate set to 2020 kbps, the resolution set to 720 x 480, and the real-time encoding set to one pass with the video preview disabled. The results? 30 minutes and 34 seconds. Both cores were firing 100%, so that's as fast as it gets with this CPU. The comparison between the Divx encode and the Nero Digital encode isn't exactly fair since there many encoding factors that impact performance. I'll use this same Nero Digital test in the future to benchmark other CPUs. Overclocking the SD39P2Thinking that things were stable after all of my tests, I fired up DX0 Optics Pro to run a batch test converting 50 Nikon D200 RAW files to JPEGs (using the standard DX0 presets), but during the conversion process the machine crashed with a blue screen of death on an 0x0000001A error. That's a memory management error apparently, so I thought perhaps the RAM I had overclocked and voltage-bumped was to blame. I was quite baffled at this point because it had completed all of the previous RAM tests without error. I fired up Memtest X86 and let it run for two complete cycles of testing, just in case the RAM was defective, and no errors came up. I thought it might have been a one-time thing, so I tried running the batch process again, and this time it was an all new blue screen of death: a STOP: 0x00000124 error, apparently linked to the sound card or sound drivers. In my searches, I found forums are rife with complaints about this specific error and no one quite knew what was causing it - some people said on-board sound chips, others said Nvidia drivers, and still others RAM problems. Searching for this error code on Microsoft.com gave me seven results, all of them forum postings from angry users looking for a solution, and not a single knowledgebase article to be found. If I was getting this error on a non-overclocked system like many of them were, I'd certainly be ticked off, but since I'm overclocking I'm expecting wonky results. The Shuttle allows for some nice overclocking options, including CPU Clock Ratio, CPU Clock, and DDR2 Voltage set adjustments. Here's a screen shot of what the overclocking options look like. After experimenting with the settings over a period of a week, I managed to achieve an overclock of 3389 mhz - a full 454 mhz faster than the stock clock speed - using nothing more than the standard Shuttle cooling fans. That's a 15% clock speed bump, which is nothing to sneeze at. I achieved that with a CPU clock of 300 mhz, the CPU voltage at +25mv, and the RAM voltage at 2.0 volts. 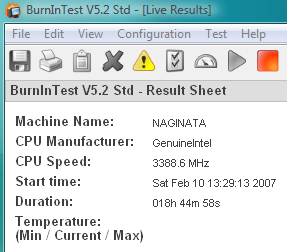
Figure 19: 18 hours into the test on a successful overclock...or so I thought. Once I had a stable overclock, I needed to torture test it. I bought a copy of BurnInTest from PassMark Software and maxed out all the test settings to produce as much load as possible. As you can see from figure 18, it passed with flying colours after 18 hours of torture testing. No errors other than two minor network errors which are statistically inconsequential. So how did it benchmark after the overclock? Overall PCMark Score: 8126 [9% improvement] CPU PCMark Score: 8516 [17% improvement] Memory PCMark Score: 6494 [14% improvement] Hard Drive PCMark Score: 6532 [6% improvement] Here's another way of looking at the results. First, the Windows Experience Index score before the overclock: 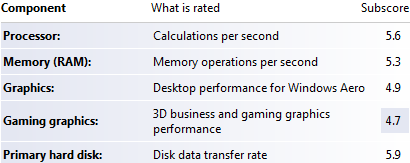
And here's the Windows Experience Index score after the overclock: 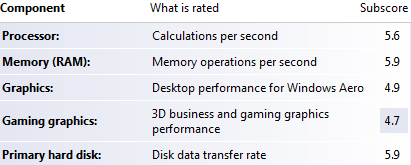 You'll notice that the only difference is the memory measurement, jumping from a 5.3 to a 5.9. Strange that the CPU score didn't change, even though there was a 15% clock speed boost - I suspect that the CPU tests aren't overly granular and a greater than 15% clock speed difference is needed to see a change in the score. Microsoft states that the current scores go up to 5.9, so a 5.6 is near top-end performance. So you'd think the SD39P2 was good to go for running at 3.3 Ghz, right? Wrong. Despite all of my tests, and all of the benchmark burn-ins, when I started loading it up with my applications (Adobe Lightroom, Adobe Photoshop Elements, Nero 7, etc.) I started to get blue screen of death crashes - usually related to the memory. After testing it a bit more, I think I've determined that the stock 800 mhz Kingston RAM I was sent just doesn't have the upper-end headroom for the type of overclocking I'm trying to do. In retrospect I'd probably have had better luck with some of their HyperX RAM. Maybe next time. Ultimately I need a system that's 100% rock solid and stable - there's nothing worse than spending hours working on a video editing project only to have your system crash, potentially losing all that work if the files get corrupted. I down-clocked my system to stock speeds and it's been 100% stable for months. ConclusionShuttle's SD39P2 is a fantastic machine - it's easily the best small form-factor machine I've used, and the best combination of performance and quiet operation that Shuttle has ever released. When combined with parts such as the Intel Core 2 Extreme X6800 CPU, Kingston 800 mhz DDR2 ValueRAM, and Western Digital Raptor and RE2 hard drives, I ended up with a system that's incredibly fast, responsive, and lightning-quick at rendering video files and editing RAW images. Using Adobe Lightroom on this computer is a joy, and Adobe Premiere Elements lets me fly through video footage. Although I had my struggles with getting the RAID array configured, now that it's set up I'm secure in knowing that my precious RAW photos and unedited video footage is safe on the Western Digital RE2 hard drives. The biggest negative I can point out about the SD39P2 is that it's already been eclipsed by the newer SP35P2. Shuttle does their best to keep up with the relentless pace of CPU innovation that Intel cranks out, and as such most of their high-end XPCs don't last long on the market. The SP35P2 looks nearly identical to the SD39P2, so that's probably the one you want. Me, I'm going to give it a pass - these system reviews always nearly kill me when I write them, so my SD39P2 and I are going to go edit some RAW photos and not try to think about how much faster it would be with one of those swanky Core 2 Extreme Quad Core processors... Jason Dunn owns and operates Thoughts Media Inc., a company dedicated to creating the best in online communities. He enjoys mobile devices, digital media content creation/editing, and pretty much all technology. He lives in Calgary, Alberta, Canada with his lovely wife, and his sometimes obedient dog. He loves fast computers.
|


 Threaded Mode