Looking for the 20% discount on FotoFusion? Use code DHT20-2 on the Lumapix site.
My son Logan was born on August 16th, 2009, but long before that I started work on a very special project: a baby book that would chronicle the process of my wife's pregnancy, our preparations for his arrival, and the first couple of weeks after he was born. This wasn't going to simply be a bunch of photos; I wanted to create a truly epic baby book, something that was off-the-charts unique and something that would become a family treasure.
I've wanted to use FotoFusion (see below for a discount coupon) to create customized page layouts for a long time now, because I knew it would allow me to break the limited confines of what typical photo book software permitted. I had carefully created all the pages in FotoFusion, exported each page as a high-resolution JPEG file, and dropped the images into full-page layouts. I incorporated my green-screen scanning technique to add objects to the book, and once I was finished - a process that took eight months of work and around 200 hours in total because I wanted it to be perfect - I had the book printed with Picaboo. The results were a complete disaster. The details are below under the review section for Picaboo, but the short version is that I was really unhappy with the physical representation of all my hard work and I wanted to get the books re-printed using a different service. But which service should I use?
I searched online for a comprehensive review of photo book printing services, and wasn't able to find any that answered this question: who makes the best consumer-grade photo books? It's not an easy question to answer, which is probably why I wasn't able to find any articles tackling the subject. In order to compare photo book printing services, someone would have to contact a broad cross-section of service providers in the USA and Canada (let's say a dozen in total), arrange for a free sample to be provided (because buying a 60-page photo book twelve times over would be $800+), build the same book with all of thetm (or as close as possible), factor in the book-building software component, then compare the eventual results of the physical books. Who'd be crazy enough to take on such a huge task? That would be me.
This review is likely the most intense writing project I've ever undertaken short of writing my last book. This project was six months in the making, required multiple re-workings of the baby book in FotoFusion to accommodate differences in book size/aspect ratios, and I believe is a unique effort on the Internet today in terms of scope and depth.
I hope you find it useful, and if you do, please share it with your friends and family - and if you feel like the review saved you money or time, a tip would be really nice. :-)
A Quick Word About FotoFusion
By far one of the top questions I've gotten asked since publishing this review is how I created the pages in the book. The process I used isn't typical. I've you've never heard of FotoFusion before, check out my review to understand what it can do - it's insanely powerful software, yet still fairly easy to use. When you see an image like the one below from my photo book, it's just one big picture - the "text" you're seeing is actually part of the image:
Everything in the image above was assembled in FotoFusion: the images were dropped into the six custom-sized frames I'd created, the text was typed up in FotoFusion (and spell-checked in Microsoft Word), and the yellow note was scanned and added to the FotoFusion layout as a transparent PNG file. When I finished the page layout, I exported it as an 8 megapixel JPEG (3300 x 2550) with minimal compressions, then dropped it into the photo book making software as a full-page image. It's important to understand that FotoFusion can export pages at extremely high resolutions; you just punch in the resolution you want, and it does it. Note that the Extreme version offers unlimited resolution exports; the Enhanced version is limited to 3900 x 5700, but that's 22 megapixels and more than enough for even the biggest photo book on the market. FotoFusion will not magically allow you to use low-resolution images though; you need to give it high quality images to get high quality output.
I can't stress enough what a powerful tool FotoFusion is for creating photo books that are unique and special. If all you want to do is have a book full of photos, the software from any of the companies in this review will do the job. But if you want to combine photos, text, and scanned objects into a single, creative layout, you'll want FotoFusion.
If you're interested in purchasing FotoFusion, use the coupon code DHT20-2 to save yourself 20% off the price. This discount works for both the Windows and OS X versions. The coupon is valid until October 31st, 2014. I use the Extreme version, but you can do everything you need with the Enhanced version - just be aware that you'll be doing it one page at a time (an unfortunate limitation in that version). If you're planning on making photo book creation a big part of what you do, the Extreme version is worth the investment in my opinion. There's nothing else like it, anywhere.
How To Read This Review
Because of the length of this review, there are three different ways to read it. If you're interested in seeing how each photo book printing service compares to each other, I encourage you to read it all the way through from start to finish. If you manage to do that, you're a superstar (this review clocks in at over 15,000 words). If you're interested in how a particular book building service is rated because you're interested in using them for a book project, jump to the individual section below:
[Other book services we've reviewed here on this site include Viovio.]
Lastly, if you want to just skip to the conclusion to see the results of my tests (which includes an executive summary of each service), please feel free to do so.
One thing to note is that I'm not factoring in the "order to ship time" for this review. The reason why? Some of the vendors provided me with a coupon code that I could use to get my book printed for free, while others had me upload my book, processed my order, and manually discounted it later. This created a scenario where it was impossible for me to accurately gauge when the process truly started and finished.
Picaboo was the company I selected first when I decided I wanted to make Logan's baby book - I'd never used them before, and frankly did zero research before choosing them. I liked the look of their Web site and their downloadable software looked simple to use, so I figured I'd give them a try. They offer photo books in 8.5" x 11" hardcover, 6" x 8" hardcover, and 6" x 8" softcover. Those aren't a lot of book size options, but at the time 6" x 8" seemed like the perfect size for a baby book, and that's the page size I used in FotoFusion when creating my layouts. Picaboo offers great custom-cover options: any picture you want on the front and back covers. They use 100 lb. archival quality paper.
September 2010 Update: For a look at Picaboo's high-end Ranch Style photo book, and their Picaboo X software, please read this review I've written. I had a much better experience with them the second time around!
Building the Book
The Picaboo software is fast and easy to use - but on the first computer I installed it on, a bit unstable. It worked great for a couple of weeks, then all of a sudden it would crash immediately after I started it up. No amount of un-installing and re-installing could get it to work, so I installed it on another computer, and it's worked flawlessly there since. The software has a peer to peer social aspect as well; you can share books you've created with other users that have Picaboo installed and are your "pals" (the Picaboo term for being connected with another person). I'm not sure as to the usefulness of this feature - perhaps for collaborative book-building projects? Regardless, I didn't test this feature.
Figure 2: The Picaboo book-building software.
The software - a fast download - is quite flexible, fast, and fun to use. You can choose from 10 different cover options, a full-page image with room for three text boxes to a collection of six images with text above and below. Or you can choose any of the dozens of preset page layouts - so you can make a very unique front and back cover. Just like the other book-building tools here, a lot of clicking is involved if you wish to have page after page of full-page images. I'm just glad I was only doing a 60 page book, and not a 120 page book!
Figure 3: I saw this a lot until I installed the software on a different computer.
If I were creating a photo book from scratching and wanting multi-image layouts with fun visual elements, the Picaboo software would be a great tool for it. In addition to offering dozens of great page layouts with a huge variety of image arrangements on the page, there are dozens of backgrounds to choose from, dozens of image corners, and the opportunity to adjust your images: brightness, contrast, border style, black & white, sepia. About the only thing missing are drag-and-drop scrapbook-style embellishments.
Unfortunately, Picaboo's software has the same fatal flaw all the others do as well: there's no visual guide indicating the space needed for the book spine. There's no visual trim guide for the outside edges either. This would prove to be a big problem for me as you'll see below. After I completed the project, I uploaded it and paid for the books.
The Results
My very first book order for Logan's baby book came from Picaboo, so I was really looking forward to seeing the results. I'd emailed Picaboo before starting to ask them how large of a margin I needed to leave around the edge of each page. They told me 0.25 inches, so I went with 0.30 inches just to be on the safe side. I remember feel a thrill as I uploaded the images - eight months of hard work was finally going to pay off! I'd managed to keep this whole project a secret from my wife; I wanted to surprise her with the baby book. I'd casually mentioned the day before I placed the order that it might be "neat" to create a baby book for Logan. She excitedly agreed, and I said I'd throw together a few pictures and get a book printed. Yes, I was pulling a classic Scotty - vastly under-promising and then over-delivering.
When the books arrived, I was extremely excited to rip open the package and see how they turned out - so I was equally crushed when I looked at the books and saw they were ruined. The 0.25 inches was the correct margin measurement for the top, bottom, and outside edge of the pages (though some pages were tight), but not the spine-side of the page. Every single page had large portions of images missing, swallowed by the spine-binding process. It's obvious that Picaboo uses a completely automated process where no human being looks at the results before they get shipped to the customer, which is really unfortunate.
Figure 4: That's not how it looked in the software preview!
Figure 5: Yes, it was as bad as it looks.
In addition to disaster with the photos and text getting cut off by the spine, the images on my first set of three books were shockingly dark. Photos printed out on the page always look darker than how they look on the screen - paper doesn't have the natural luminescence of an LCD monitor - but these were dark in a "What the heck? Those look awful!" sort of way. I'd spent $169.43 getting three copies of the book - one for us, one for each set of grandparents - and that's after a $69.59 discount from a coupon. To say I was upset is putting it mildly.
I contacted Picaboo tech support over the phone, and the person I dealt with was very helpful and understanding. I emailed him photos of how the books turned out, along with screen shots showing that the software did nothing to warn me this was going to happen, and he agreed to give me a full credit to reprint the books again. I painstakingly modified the layout of every single page in FotoFusion, this time opting for a full inch of gutter space on the spine side and increased margins on all other sides just to be safe. It took me at least five hours of work to modify the pages inside FotoFusion, and I checked them over and over again. I also boosted the brightness of most of the images using the brightness adjustment tools inside FotoFusion. This wasn't ideal, but I wasn't going to go back to Lightroom and re-edit all my raw photos, re-export them, and re-import them into FotoFusion. By this point, I was trying to make the best of a bad situation.
Please click on the video above to watch it on YouTube in 1080p full screen mode.
When the second set of books arrived, I was pleased to see that the images were all safe from the gutter. The brightness boost also helped make the images brighter, but some of them were a bit washed out. I also couldn't help but feel like the overall page layout felt squished because I brought all the elements in toward the centre. The pages didn't have a lot of white space between the images, and many of the images looked muddy. I wasn't very happy with the quality, so I started down the path of writing this review.
Book Details: 60 page, hardcover, custom cover
Book Cost: $119.59 USD (11" x 8.5"), $69.59 (8" x 6"), $11.08 shipping to Canada
Paper Quality: Poor > Average > Excellent > Superb
Print Quality: Poor > Average > Excellent > Superb
Cover Quality: Poor > Average > Excellent > Superb
Overall Quality: Poor > Average > Excellent > Superb
Treasure-Book.com was a company I hadn't heard of before doing a Google search for photo book companies. After doing a search for Canadian photo book companies, they came up (they're based out of BC) so I thought I'd give them a try. Treasure-book.com does 4" x 6" landscape or portrait, 8.5" x 11" landscape or portrait, 8.5" x 8.5" square, and 12" x 12" square photo books in hard cover leatherette or suede. The photo wrap covers are available in 8.5" x 11" landscape or portrait, 8.5" x 8.5" square, and 11.5" x 11.5" square.
Treasure-Book has provided a coupon for Digital Home Thoughts readers to use: DigiHthoughts15 will get you 15% off your order, valid until April 6th, 2012.
Building the Book
After downloading the 86 MB software, it installed without incident. When I started it up, which strangely requires a User Access Control prompt every time you load it, it looked familiar. It turns out that "My Photo Books" is photo book making software licensed by several online photo book makers. Developing software is hard work, and if the expertise of the photo book company is presumably in printing and binding, there's a certain logic in not focusing on the software. The key then is whether or not the My Photo Books software is good software for making photo books.
Figure 9: The My Photo Books software.
For the most part, it is. The user interface is a bit strange - it has a bottom-left pointing arrow for the minimize button, and it doesn't look like your typical Windows application. At first I thought it was a Java app because it seemed a bit sluggish, but it's not Java - it's just not that snappy. When you first start it up, you have three options: Create New Book, Fast Track, or Open Saved Book. Create New Book allows you to create a new book from scratch, where the first option is selecting the size (4" x 6" up to 12" x 12") and type of cover (Custom Softcover, Keyhole Hardcover, or Standard Hardcover). Once you pick the size, the software loads the book template, and the rest is largely up to you. The Fast Track option is a wizard-based approach to building a photo book. You select the size of book you want, the book cover type, a theme (Baby Boy, Clean, Travel, Wedding, etc.), the photos you want, and boom - it creates the book for you. You can fine-tune it all later.
Figure 10: Getting started with the project.
You can drag and drop your images directly onto the page - there's a nice "Single Page Background" option that comes up when you drag and drop an image that will fit the image to the page. This method is much easier than most of the other software I used - such as Picaboo - which required many clicks to accomplish the same thing. There's also a "Two Page Spread Background" option that would be great for panoramic photos. A welcome feature is the ability to drag your background around on the page to fine-tune the layout - this was especially helpful in my case where every page had a single image applied as a background. There's unfortunately no page trim indicators, or spine gutter indicators, so you don't really know what's going to get cut from the edge of the page or be hidden by the spine.
Figure 11: Various layouts are offered.
The My Photo Book software is surprisingly sophisticated in how it allows for the resizing, creation, rotation, and re-positioning of image frames. If you come up with a page layout you like with certain image frames at certain sizes, and in specific locations, you can save that as a page layout. This gives you quick one-click access to it for future pages. Very handy stuff! There's also one-button black and white or sepia options, and an enhancement function called "Perfectly Clear Images" which is essentially an auto-adjust feature.
It would have been nice if the My Photo Book software asked you up front how many pages you needed, but CONTROL+I allows you to insert a page, so pressing and holding CONTROL+I inserted all the pages I needed in a matter of seconds. Other programs weren't nearly as streamlined. I did notice a peculiar glitch with the My Photo Book software where sometimes I'd click on an image to select it before dragging and dropping it into the layout and the selection would de-select itself and move to the previous image. It was like a game of whack-a-mole. I found that if I clicked on another part of the program, then clicked back onto the image, it would let me select it again.
Figure 12: Creating a photo cover took much more effort than it should have.
Creating the front and back covers was a bit tricky. The My Photo Books software isn't geared up for easy cover creation; when you drag and drop an image onto the cover, there's no option for "Single Page Layout". The only way to fill the cover is to re-size and re-position the image over and over, and because the trim lines are dark gray, if you have a black background, they're impossible to see. This software needs some serious improvements related to full-page photo covers.
Once I finished dropping in all the images, I clicked the "Send to Treasure-Book" button, and the software processed the file. This is a CPU-intensive task, pegging one CPU core, but only one CPU core, at 85% to 99% usage. After that process completed, which took under three minutes, the preview process kicked off: the software provides you with a PDF preview of the final output. This is useful, and in looking at the preview I noticed it was missing one critical thing: there's no indication of the space required for adequate clearance on the book spine. If you're printing full-page single-photo images where there's no action around the edges, it won't matter. But if you're printing a custom book with text, not being able to see how much space you need to avoid having your images or text swallowed by the spine is a bit frustrating.
Once the upload completed, I was taken to an order page on Treasure-Book.com. Here I was given the choice between Tan Suede, Charcoal Suede, Blue Suede, Black Leatherette, Navy Leatherette, and Burgundy Leatherette covers. There's no image preview in the order process, so I had to open up a new tab and visit the home page to figure out which colour I wanted. The images showing the cover types are all a little small, but Navy Leatherette looked like a good match for my book design. I had my book printed by Treasure-Book.com first out of all the companies in this review, and at the time they didn't offer custom hard covers like some other book makers do - but now they do. They offered to send me another copy of my book, this time featuring the photo cover, so that's what I used for the evaluation portion of this review.
I'd be remiss if I didn't mention the very hands-on customer service that Treasure-Book.com offers - I found them very responsive and helpful when I had questions about building my book, and I love that they offer spine printing on special request given that neither Mpix nor Photobook Canada does and they're all using the same book-building software.
The Results
Figure 13: My Treasure-Book.com photo book, front. [HIGH-RES IMAGE]
Figure 14: My Treasure-Book.com photo book, back. [HIGH-RES IMAGE]
Figure 15: My Treasure-Book.com photo book, spine. [HIGH-RES IMAGE]
Please click on the video above to watch it on YouTube in 1080p full screen mode.
Book Details: 8.5" x 11", 60 pages, custom photo wrap hard cover
Book Cost: $79.59 CAD + $9.35 shipping
Paper Quality: Poor > Average > Excellent > Superb
Print Quality: Poor > Average > Excellent > Superb
Cover Quality: Poor> Average > Excellent > Superb
Overall Quality: Poor > Average > Excellent > Superb
Blurb is a company big on personality - just check out this letter from their CEO - and a company that prints "real" books and not just photo books. They have options for allowing authors and photographers to sell their books and earn a mark-up, along with other interesting offerings. For the purpose of this review, however, I'm focusing strictly on their photo book offerings. Their photo book offerings are a 7" x 7" square, 8" x 10" standard portrait, 10" x 8" standard landscape, 13" x 11" large landscape, or 12" x 12" large square. Blurb offers discounts on 10 or more of the same book and cover type, and they also have a premium paper option.
Building the Book
Blurb uses stand-alone software to design books, and the Blurb BookSmart 2.5 software client was a quick download at 43 MB in size. It installed quickly and easily, without a single User Access Control prompt. The software is a bit sluggish to launch, but once it loads, it's fast and easy to use. The initial step when creating a book is to select the size - Blurb offers 5" x 8" landscape, 7" x 7" square, 8" x 10" portrait, 10" x 8" landscape, 13" x 11" landscape, and 12" x 12" square books. After you pick the size, several different layouts are offered. I selected Photo Book, which looked to be a good choice for full-page layouts. Photos can be selected from your local hard drive, or from Flickr.com, Photobucket.com, Picasa Web Albums, or SmugMug.com. Importing the photos from the hard drive is a somewhat slow process, but thankfully the Blurb software is multi-threaded, using both CPU cores on my test machine.
Figure 17: The Blurb BookSmart software.
Blurb's software is definitely one of the more sophisticated programs that I've used. The proof is that there's an option for trim guidelines; when you turn this feature on, you see a pink box around the outside of your image. As long as you keep your image away from the pink area, you won't lose any of it. This is something that every other program I looked at lacked. While seeing the page trim lines is helpful, there's no preview for the book spine - I had to guess how far away from the inside margin to position the images. I'm amazed that no one gets this part right.
Figure 18: The Trim Guidance info.
Another helpful feature is the ability to use the arrow keys to control fine-grained movement of your image. This was especially helpful when I dropped in my full-page images, formatted for 11" x 8.5" inches, into their 8" x 10" book size. Unfortunately many of my images were too wide for the trim lines at this size, so I had to go back to my source project in FotoFusion and re-format my book for 8" x 10". Let this be a lesson to everyone out there: before you even start a project like this, make sure you decide up front what book size you're going to be creating.
The Results
Blurb went above and beyond for me in this review: I had requested their ImageWrap cover, but they ended up sending me all three of their cover types; softcover, hardcover dust jacket, and hardcover ImageWrap. All three cover types were printed from the same project I uploaded. Each type of book has a distinctive look; of the three, the ImageWrap is my favourite.
The ImageWrap cover is a matte cover, with just a hint of gloss, and it's smooth and almost soft to the touch. Small scratches aren't visible on the cover; it holds up quite well to wear and tear. There were some minor layout quirks on this cover though - the book title, printed on the spine, was shifted upward slightly. The back photos were shifted downward, getting dangerously close to the bottom.
The hardcover with the dust jacket is about what you'd expect: a high-gloss cover printed on thick card-stock.The glossy cover jumps out at you, making your image look great. Like most glossy surfaces though, it shows scratches and fingerprints. The spine printing was perfect on it, as were the photos printed on the back. Under the dust jacket, the Blurb book is black and covered in a tough woven material. The dust jacket version of the book was the one that Blurb printed on their premium paper, which is described as "100-pound text silk-finish paper". The premium paper feels ever-so-slightly heavier to the touch than the regular paper, but despite much eye-straining, I really couldn't see any difference in the image quality. This option is useful if you want your book to feel more luxurious to the reader flipping through it, but don't buy it expecting to have better-looking images. Compared to the photo paper used in most of the other books, Blurb's premium paper felt much thinner. Don't waste your money on this upgrade.
Please click on the video above to watch it on YouTube in 1080p full screen mode.
Note: After shooting the video, I re-considered my opinion on Blurb's paper; compared to the paper used by the other companies in this round-up, Blurb's paper, even their premium paper, can only be described as average. The paper rating of average impacted some of the overall ratings.
The softcover book is glossy, and quite a bit thinner than the other books because it lacks a hard spine. The glossy cover looks great, but it's highly vulnerable to damage. After a week or so, the cover had visible scratch marks on it. There's something innately fun about a softcover book however - it's more approachable than a hard-cover book. I think a Blurb softcover book at 7 inches by 7 inches, and 100+ pages thick, would be a great combination. I noticed something immediately on inside pages of the softcover version though: at the bottom of every single page, there was a white line of varying thickness where the image didn't cover the whole page. Baffled, I returned to my Blurb source file and examined the layout on every single page. With the exception of one page where I clearly wasn't paying attention, the images were well inside the trim lines. Here's an example of how far the image was inside the trim lines according to the software:
Figure 27: My image is inside the trim line.
And here's a photo of how that page printed out in the softcover book:
Figure 28: The result is nothing like the preview.
As you can see this isn't a thin, barely-visible line: it's quite obvious on every single page. When I asked Blurb for comment, they didn't reply to my email. I emailed them again, and after more than three months, I still hadn't heard back at the time this article went live. I would hope that, as a paying customer, if Blurb sent a book out with an obvious printing error like this, they'd allow the customer to get a reprint.
APRIL 15th, 2010 UPDATE: After this article went live, Blurb notified me that they'd offer any customer a reprint if this page trimming problem happened to one of their books, so they sent me a new book and it looks great! Good to know that if I had contacted Blurb's customer service rather than their PR people, I'd have had this issued fixed. Nicely done Blurb!
Book Details: 8" x 10", 60 pages, ImageWrap
Book Cost: $24.95 USD for softcover, $35.95 for hardcover with dust jacket, $37.95 for hardcover with ImageWrap; $6 USD for premium paper option on hardcover with dust jacket, $7.99 CAD for shipping to Canada (covers up to five books).
Paper Quality (Softcover): Poor > Average > Excellent > Superb
Print Quality (Softcover): Poor > Average > Excellent > Superb
Cover Quality (Softcover): Poor > Average > Excellent > Superb
Overall Quality (Softcover): Poor > Average > Excellent > Superb
Spine Printing: No
Paper Quality (Dust Jacket): Poor > Average > Excellent > Superb
Inkubook ranks high in the "quirky company name" category, but they also have a lot to offer and are worth considering. They offer books in several sizes; the Mini Brag (7" x 5" landscape), the Simple Square (8.5" x 8.5"), th Ultimate Portrait (8.5" x 11" portrait), the Classic Landscape (11" x 8.5" landscape), and the Great Big Square (11" x 11"). Their books are printed on 100 lb., "archival-quality silk paper". I should note that Inkubook offers coupons via email quite frequently, which is a big money saver if you're printing multiple books.
Inkubook has provided a discount coupon specifically for Digital Home Thoughts readers; use the coupon code DIGIHOME30 to get 30% off any order. This coupon is limited to one per customer, to a maximum of $100 in value, and is valid until December 31st, 2011.
Building the Book
Unlike most photo book printing sites, Inkubook uses a browser-based book creation tool. Surprisingly, it's not Flash-based: they're using Microsoft's Silverlight technology. After you create your free account and log in, there's a big orange "Start a New Book" button. Step two is picking the book size: they offer 7" x 5" landscape, 8.5" x 8.5" square, 8.5" x 11" portrait, 11" x 8.5" landscape, and 11" x 11" square. Strangely, not all sizes are available in softcover, but all sizes are available in hardcover. 12" x 12" is an industry standard size based on all the sites I've looked at, so it's curious to see Inkubook go with an 11" x 11". Thankfully, square is square, so there's no need to re-format your layout if you've gone square.
Figure 30: The Inkubook book-building process.
I selected the 11" x 8.5" landscape, which is only available in hardcover, and browsed through their themes next. They offer a variety of categories - photo book, wedding, travel, cookbook, etc. - and each category has a variety of themes and backgrounds associated with it. I wanted to keep things simple, so I selected Photo Book as the category, and Photobook as the theme. Next came picking between "Starting from Scratch" and "Autofill My Book". I selected Autofill, hoping that it would be smart enough to fill each page completely with an image. Photos in the next step are pulled from Flickr, your local computer, or Inkubook - the last option meaning, I presume, previously uploaded images.
Here's where having a browser-based system becomes problematic: uploading your images can take quite a while, and their system doesn't seem to be very robust at recovering from problems. In my case, I kicked off the upload of my 62 images, which were a total of 170 MB in size, and left for an appointment. I came back, and my computer had gone to sleep - I woke it up, and saw that the upload hadn't completed. It was stuck on "Building Your Book: 56 of 58". Here's one of the error messages that popped up while I was building my book:
Figure 31: One of several error messages the Inkubook site presented.
The good news is that when you add a new page, it's based on the page before it - so it "only" took me 40 or so clicks of the Add Page button. It would have been easier if part of the book setup was "How many pages do you want?" and a default selection for each page. One of the things I really liked about Inkubook's Web-based process is that after an image has been uploaded, you can immediately drop it onto your page. Other services make you wait to upload all the images, then allow you to start building your book. The Inkubook method is vastly superior and allows the user to build each page as the images become available.
At the end of the process, after you put in your shipping information, you have two options: black or white end leaf colour (the sheet that is attached to the inside page of a case-bound book), and a matte or glossy cover finish. And that's it!
Shutterfly has been in the photo book business for a long time; I used them to create a small wedding album for my wife nine years ago, but haven't used them since. They offer books in a variety of sizes; softcover 5" x 7", and softcover 7" x 9". The 8" x 8", 8" x 11", and 12" x 12" books are available in softcover, hardcover with a photo wrap, or a padded photo cover. There are also options for fabric hard covers and leather hard covers with a die-cut window on some sizes. I ordered the padded cover for this review.
Building the Book
Shutterfly's book-building system is entirely Web-based, so the first thing you're in for is a potentially long wait as you upload your images. Unlike Inkubook, there's no way to build your book as each image uploads - Shutterfly has a traditional pop-up window for uploads, and until that's finished, you can't close it or do anything else with your book.
Figure 35: Building your book with Shutterfly's Web-based tool.
Shutterfly's browser-based book builder isn't very feature-rich, but it does all the basics quite well. You can select from among several book styles, or create your own from scratch. The page previews are unfortunately quite small - the Shutterfly system is designed to work on fairly low-resolution monitors - but you can click on the Zoom button to see larger previews of how your pages look. Like every other process reviewed here, if you're doing a 60 page book where every page is a full-page image, be prepared for a lot of clicking as you apply a full-page layout style to each page. There are options for getting creative; Shutterfly offers a selection of page backgrounds and photo edges. The front and back covers can be full-page images.
Figure 36: The spine printing function was obvious to see, and easy to use.
Figure 37: Ooops - error!
After I'd spent some time creating the book, I wanted to save my progress, so I clicked the Save button. More than 60 seconds passed as I waited and waited for the project to save - eventually the error message above (Figure 36) popped up. I added another couple of pages to my book project, then clicked Save again - this time, it worked. There doesn't appear to be an auto-save function, which is a dangerous shortcoming for any browser-based book-building system. Any number of things can take a browser down, and you don't want to lose all the work you've put into the book. Remember to save often!
After I completed my book, I used the preview function to ensure it looked the way I wanted, and proceeded with the order.
Please click on the video above to watch it on YouTube in 1080p full screen mode.
The images were slightly warmer in tone than I was expecting - on some pages the images looked almost orange. This is from an automatic image enhancement Shutterfly offers called "Vivid Pics". This option can be turned off on your Shutterfly account, but nowhere during the book building and ordering process was I presented with the choice to turn this off or on. I'd like to see Shutterfly allow users to select this feature on a per-book basis.
Book Details: 8" x 11", 60 pages, padded photo cover
Book Cost: $61.59 USD, $6.99 shipping (4-10 days to Canada)
Paper Quality: Poor > Average > Excellent > Superb
Print Quality: Poor > Average > Excellent > Superb
Cover Quality: Poor > Average > Excellent > Superb
Overall Quality: Poor > Average > Excellent > Superb
I'm familiar with Adorama from years of reading Popular Photography and seeing their ads in it, but I've never had the opportunity to check out their photo printing services before now. AdoramaPix is the photo-printing arm of the parent company, Adorama, and they offer a variety of photo printing products. Their photo books are printed on Fuji Crystal Archive Album photo paper, and they use Leporello bindings that allow for lay-flat pages. I was excited to check out the lay-flat pages, because that's something that most photo books at the consumer price point don't offer - you typically only see lay-flat pages in the $200+ wedding albums. Book sizes are 6" x 4" portrait, 8" x 5.5" portrait, 12" x 9" portrait, 6" x 6" square, 8" x 8" square, 12" x 12" square, 6" x 7.5" landscape, 6" x 9" landscape, 8" x 10" landscape, and 8" x 12" landscape.
July 2010 Update: AdoramaPix now offers a 76-page option for their lay-flat books.
August 2010 Update: If you live outside the USA (say, Canada), and you ask AdoramaPix if they'll ship a book to you, they'll say no, they don't ship to that country. However, if you build a book and go to their ordering page, if your country is listed, they'll will ship it to you (they do ship to Canada for instance). Makes no sense, right? Indeed - yet this is the explanation I received from my contact at AdoramaPix. This is quite a confusing mess, so I recommend you skip AdoramaPix if you live outside the USA - they really don't seem to want your business, so why give it to them?
Building the Book
AdoramaPix uses a browser-hosted Flash-based system for building the book. The first choice was to select the size; I chose 8" x 10" as it was the closest to the 8.5" x 11" layouts I had built. There are two page-count options: 26 pages, or 50 pages. I guess that means you'd better have either 26 or 50 photos page layouts exactly! They offer a couple dozen themes, but I chose to build my book from scratch. I have to say that it was painful to delete ten pages from my baby book project - every page was important to me, so I was really disappointed that AdoramaPix has a limit of 50 pages on their books.
Figure 41: Uploading the images.
The next step was uploading the images. You're given four options; AdoramaPix Galleries, Upload from Computer, Import from Flickr, and Import from Picasa. I'd like to have seen Smugmug in that list, but since I had all my photos on my local computer, I went with that option. I initially selected my photos and dropped them in the right-hand zone which said "Drag and drop photos here to add to project", but it turns out that's not really what they mean - this zone is where your photos appear automatically after they've been uploaded. Not a great user interface decision here!
After browsing to the folder with my images, the Flash-based uploader immediately started to upload my images. As you can see in the screenshot above, after each upload completed, it marked the upload with a yellow warning sign. Mousing over the warning sign gives no detail as to what it means; eventually after all my uploads completed - which took about 9 minutes with my 2mbps upstream speed - and by the end two of the images still had the yellow warning sign. Irritatingly, the NAME column in the uploader can't be resized, so I was unable to determine which of the two files were problematic - even when I stretched the IE8 window across the entire width of my two 24" monitors, which is 3840 pixels, and I still couldn't see the file name. Again, this is just bad design - if you're going to show someone a yellow warning icon, you should tell them what it means when they hover their mouse over the error.
Figure 42: Building the book with AdoramaPix.
Once I got into the editor, it was pretty simple to layout the photos - I dragged each photo from the images tab over onto the page, then clicked again to make each image fit to the page. It would be nice to see the editor offer that as part of the click and drag process (like the My Photo Books software does), or have an Auto-Fill function that works. I couldn't figure out how to auto-fill the pages because there was no way to select all my images. I also wasted several minutes trying to get rid of the green border surrounding my front and back cover (see above), thinking that it was some sort of border, only to discover in the preview mode that the three I was seeing wasn't actually part of the book. It's baffling that the editor would show a thick green border around the cover of your book, then when you're viewing the inside pages, it switches to a thin green border. This only serves to confuse the user - why show something that isn't part of the final product?
On the plus side, the editor offers nearly 2000 "stickers", which are everything from clip-art Christmas ornaments to photo-realistic seashells and crayons. There are also 21 image frames, and over 500 backgrounds for your pages. I can definitely see someone creating some interesting scrapbook pages with all the content that AdoramaPix offers as part of this tool. The editor also offers the ability to save your book, zoom in and out, and even display a grid for precise layout decisions. In the preview mode there's also a slick animation showing page turns. For a browser-based Flash application, it's quite sophisticated.
Once the book is finished, clicking on Order brings you to a page where the size and number of pages are confirmed - and you have an option of having Adorama's Photo Correction applied (which is recommended), or having them not touch your images. Though I'm confident in the quality of my images, I was curious to see what this option would do to my images, so I opted to have the photo correction applied to my book.
Figure 45: The AdoramaPix photo book, inside pages.
Please click on the video above to watch it on YouTube in 1080p full screen mode.
Before publishing this article, but after shooting this video, I changed my mind and bumped the print quality from average to excellent. I spent some more time comparing print quality between the books, and the AdoramaPix book is in the top four - though I'd still have liked to seen how my images looked without their photo correction turned on because some pages looked a little more dull than I expected. There was a white line at the top of every page as well, and I don't believe it was like that in my layout. Still, when looking at the book, you can't help but see how much it stands out from the other books in this price range.
In discussions with my contact at AdoramaPix, it turns out that I could have had printing on the spine - if I had realized that I needed to create a text box, drop it on the black bar that represents the spine, rotate it 180 degrees, then type in my text. Not exactly intuitive! They definitely need to make this part easier.
Book Details: 50 page, custom hardcover book, 8" x 10"
Book Cost: $65.58 USD + $24.95 for US Mail shipping to Canada (flat-rate international shipping)
Paper Quality: Poor > Average > Excellent > Superb
Print Quality: Poor > Average > Excellent > Superb
Cover Quality: Poor > Average > Excellent > Superb
Overall Quality: Poor > Average > Excellent > Superb
"Kodak" and "photos" still go together in the minds consumers like peanut butter and jelly, and Kodak has parlayed that brand recognition into a strong online presence for photo sharing, printing, and book making. Kodak offers 5" x 7" or 8.5" x 9.5" softcover books, and 9" x 10.25" or mammoth 12" x 14" hardcover books. In terms of covers, they offer the old-school picture-window style and the imagewrap style.
Building the Book
Kodak Gallery uses a Web-based system, and the first step in building a book is to upload the photos - so in my case, the first thing I had to do was upload 667 MB of images. The uploader was multi-threaded, uploading four images at a time, but there's literally nothing you can do while the images are uploading, except wait. In my case the upload took about 45 minutes, and when it was done, I had my 62 images loaded into an album.
Figure 47: Picking your cover.
Putting the photo book together was a little different than the other sites I've covered in this review. You need to go into the Photo Books category, then click on Shop Photo Books, and then select your book type. It's a bit different from the photobook-centric approach other sites use, but it works.
Figure 48: This is the best I could do for the cover.
Another difference is that the printed hardcover doesn't have an image that fills the front. Your image gets printed on about 70% of the cover, and there's a strip up top where your text gets printed (see above). You get to pick the colour of the cover, choosing from between five solid colours, and ten designs. The back has a tiny square for a photo, and a small bit of text below it. Compared to the other services that let me put an image on the entire cover, front and back, this was quite disappointing. And there's no spine printing either. Next, you get to select from among 35 page designs. Since I'm doing full-page photos, this step doesn't matter to me, but there are some nice page designs to choose from.
I ran into a significant snag trying to get the baby book printed with Kodak Gallery: their book size of 9" x 10.25" wasn't a similar enough aspect ratio to fit either the 8" x 10" or 8.5" x 11" versions of the book that I had. I didn't want to go through the painful amount of work to re-format the book for yet another size, so I opted instead to get a 60 page book printed with individual full-page photos rather than the premade images I'd created for the othe books. I used many of the same photos, so for comparison purposes, I don't expect to run into any trouble. It never occurred to me that there would be such "creativity" when it comes to book sizes amongst all the major players.
Figure 49: Building your book using Kodak Gallery's Web-based system.
The Kodak book builder is a Flash-based tool, and while it's easy to use, the word that best describes it is "ponderous". Rather than having your photos be available for instant drag and drop, they're at the top of the screen in a fly-out panel that appears after you mouse over it and wait for a second. It's neat the first five times you see it, but after that, it's tedious. There's no option for a book that's populated with full-page layouts, so for every page I had to click on the layout tool and drag and drop the full-page option. You can't drag and drop the same full-page option onto both pages in the layout either; you have to click and drag the left one onto the left page, then move over to the right page and find the full-page option there. Doing this 60 times was mind-numbing.
After you drag and drop the image onto the page, there are some basic options: you can re-position it on the page, and the tool helpfully doesn't allow you to expose any of the background, which is great. There's no preview of the book spine, however, so if you have an image with detail you don't want to get cut off spine-side, you have no way of knowing what it's really going to turn out like. You can zoom in on the image, and there are options for sepia and black and white-toned images. The Kodak tool is simple enough that I could see my mom using it, but for a power user looking to build a book quickly, it's monotonous.
Thankfully, once the book-building process was complete, it was fast and simple to place the order.
The Results
Figure 50: Extra points for presentation - I really liked this added touch.
Figure 51: The Kodak Gallery photo book, front. [HIGH-RES IMAGE]
Figure 52: The Kodak Gallery photo book, back. Check out that huge bar code! [HIGH-RES IMAGE]
Please click on the video above to watch it on YouTube in 1080p full screen mode.
Book Details: 9" x 10.25" hardcover book with imagewrap cover, 60 pages
Book Cost: $74.59 + $14.99 shipping (1st class mail to Canada)
Paper Quality: Poor > Average > Excellent > Superb
Print Quality: Poor > Average > Excellent > Superb
Cover Quality: Poor > Average > Excellent > Superb
Overall Quality: Poor > Average > Excellent > Superb
This section of the review has been updated as of April 2011 with new book options. MyPublisher now has photo finish (image wrap) covers, lay-flat pages, and a Super Gloss Printing option that has to be seen to be believed.
MyPublisher is one of the heavyweights in the photo book industry - they've built and shipped more than 5 million books since 2002. They offer hardcover books in 11.25" x 8.75" (Classic), 15" x 11.5" (Deluxe), and 5.75" x 7.75" (Pocketbook) sizes. Softcover books can also be created at the 7.75" x 5.75" in size. They also offer a book style called the "My Mini" which is a small 2.75" x 3.5", 20 page softcover book. The quarter-inch and three-quarter inch sizes are curious - there are only so many brands of high-end printing presses in the world, so I wonder why MyPublisher has such unique sizes? MyPublisher uses "premium 115-pound high-gloss archival quality paper" in their Classic Hardcover books. They now offer photo finish (image wrap), book jacket, linen or leather covers.
Building the Book
After downloading the 11 MB MyPublisher 4.0 software client (the current version as of April 2011 is version 6.0), it installed quickly and I was starting to build my book within a couple of minutes. The first few screens are selecting the product you want to build - photo book, calendar, greeting cards, or book jacket - followed by the size. This visually-driven approach is much nicer than the text-based drop-down menu approach from the companies that use the My Photo Books software. After selecting the books size, I was presented with a choice of ten different book styles, including Bestseller, Wedding, Baby Boy, Travel, Collage, and others. I selected Just Photos, since all my photos are full-page images, and opted for the Book Jacket as the cover style. They also offer the typical picture window option, but I've never been a fan of those. Selecting the images was next, but I discovered that MyPublisher doesn't like PNG images:
Figure 54: No PNG files for you with MyPublisher.
The back of my book was a PNG file, so after I converted it to JPEG, the book-building process could continue. It's a bit odd that PNG isn't supported by the software - it's not as though it's an unusual or rare format.
Figure 55: The MyPublisher book building software.
The MyPublisher software has a nice user interface, but it's pretty sluggish and can become unresponsive at times. I saw the spinning blue "This application is doing something, hang on" Vista circle icon more than once, and this is on a system with a Core 2 Extreme X6800 CPU at 2.97 Ghz, 4 GB of RAM, and a Western Digital Raptor 15,000 RPM hard drive. It looks like it's multi-threaded, because when I dropped an image onto the page, I saw overall CPU usage shoot up to 69%. Dropping an image onto the page and waiting for it to resolve takes 5 seconds...I shudder to think how slowly this software would be on a single-core, lower-speed CPU. On the plus side, the images in the layout are crisp and clear, and seem to be full resolution, so you can see all the details of your images on the page.
Figure 56: Selecting the page layout.
A source of frustration with this software is how it locks the page into using certain photo layouts. Instead of assuming full-page images and customizing from there, or at the very least allowing a full-page layout to be implemented with a couple of clicks, the MyPublisher template makes all right-hand pages multi-image layouts. And, bizarrely, there's not even an option to force the page layout to a single full-page image. The only thing I could think of doing was deleting all the pages, then inserting new pages that are set to a full-page image. That's an ugly approach to take; the developers of MyPublisher 4.0 should re-work how this part of the software works.
Figure 57: Is that thin white line going to show up in my photo book?
Another point of curious design is the decision to show the user a thin white line next to where their image is on the page. At first I thought this meant that my image didn't cover the entire page, and that white line was showing me that I'd have a white line on my page - that's the whole idea behind WYSIWYG interfaces after all - but when I tried to move my image on the page toward the white line, it didn't cover it up - meaning it's not really part of the layout. I think MyPublisher is trying to make the book as realistic-looking as possible, but that shouldn't come at the expense of usability. And speaking of moving the image, it's irritating not to be able to move the image with the keyboard - it's easy to nudge an image around using the arrow keys in other applications, but in MyPublisher 4.0 you have to click on the image, then click on the hand icon, then click and drag your photo - and watch it move up or down even if you only meant to move it left or right.
One of the nice touches is the ability to customize the inside of the dust-jacket; you can add three blocks of text and one image on the inside-left flap, and the same for the inside-right flap. If you were creating a collection of your photos, this is the place you'd put your photo and bio. There's also a toolbar that pops up when you click on any of your images, and this toolbar can be used to rotate your image left or right, mirror it horizontally, convert it to black and white, auto-adjust your photo, crop, remove red eye, resize an image, zoom in or out, and move the image around on the page. I had to click on some of those icons to figure out what they did because the MyPublisher 4.0 software lacks pop-up tool tips to tell the user what each icons means.
When I finished previewing my book and clicked on the Purchase button, the software informed me that there was a typo - my last name of "Dunn". Having a spell checker built into the software is a great touch - there's nothing worse than paying a bundle of money for several copies of a photo book and then finding a typo in them. The order process is fast and efficient - it's not until the very end that the software uploads the book, and depending on the speed of your connection, it might take a while.
Even before I got the book, I was impressed with MyPublisher's ordering process - their system is very communicative about the status of the order. As I mentioned earlier, I'm not tracking the printing and delivery speed of each book publisher, but I will say that MyPublisher was the fastest overall process from when I clicked Order in the software to when the book showed up. We're talking days when most of the other companies took a week or more.
MyPublisher Classic Hardcover with Dust Jacket Cover
Please click on the video above to watch it on YouTube in 1080p full screen mode.
Book Details: 11.25" x 8.75" hardcover book with book jacket, 60 pages
Book Cost: $60.59 + $12.99 for shipping to Canada (FedEx, 3-5 business days)
Paper Quality: Poor > Average > Excellent > Superb
Print Quality: Poor > Average > Excellent > Superb
Cover Quality: Poor > Average > Excellent > Superb
Overall Quality: Poor > Average > Excellent > Superb
Spine Printing: Yes
MyPublisher Classic Hardcover with Photo Finish Cover
Please click on the video above to watch it on YouTube in 1080p full screen mode.
In late 2010, MyPublisher started offering a photo finish (photo wrap) cover, so they sent me another copy of the baby book with this new cover. I loved it! MyPublisher already had excellent paper quality, and superb print quality; the only thing I didn't like was the dust jacket. It's a personal preference thing of course, but having a photo right there on the permanent cover of the book is great - so this new addition from MyPublisher scores very high in my books!
Book Details: 11.25" x 8.75" hardcover book with book jacket, 60 pages
Book Cost: $60.59 + $12.99 for shipping to Canada (FedEx, 3-5 business days)
Paper Quality: Poor > Average > Excellent > Superb
Print Quality: Poor > Average > Excellent > Superb
Cover Quality: Poor > Average > Excellent > Superb
Overall Quality: Poor > Average > Excellent > Superb
Spine Printing: Yes
MyPublisher Classic Hardcover with Photo Finish Cover, Lay-Flat Pages, and Super Gloss Printing
Please click on the video above to watch it on YouTube in 1080p full screen mode.
In early 2011, MyPublisher added two exciting new options to their books: lay flat pages, and super gloss printing. The combination of these two options makes for an expensive ($129.35) 60 page book, but the results are jaw-dropping. The lay flat pages make for an impressive visual, and the paper and print quality of the images on the super gloss printing is simply stunning. Everyone I've showed this vacation book to has been wowed - they've never seen anything like it. Other book publishers might catch up one day, but for now, MyPublisher has something very unique in the market. Remember that coupons change everything - if you order two copies of your book during a BOGO (Buy One Get One) promotion, you'll effectively get them for 50% off.
One thing worth noting: the paper that comes with the super gloss printing option isn't very thick (heavy), so a 60 page book doesn't get very thick and lacks the, shall we say, "gravitas" that a 60 page book from Photobook Canada with the upgrade paper would have. There's a certain association of quality we associate with an object's weight, so this is something to keep in mind if you're doing a wedding album or something that you want to feel "serious". The super gloss printing looks insanely good for the paper being so thin!
Book Details: 11.25" x 8.75" hardcover book with book jacket, 60 pages
Book Cost: $129.35 + $12.99 for shipping to Canada (FedEx, 3-5 business days)
Paper Quality: Poor > Average > Excellent > Superb
Print Quality: Poor > Average > Excellent > Superb
Cover Quality: Poor > Average > Excellent > Superb
Overall Quality: Poor > Average > Excellent > Superb
Snapfish, an online photo service owned by HP, offers a variety of photo book options: 8" x 11" and 8" x 8" Personalized Cover Books, 8" x 11" Classic Photo Books, 12" x 12" Signature Photo Books, 5" x 7" Everyday Photo Books, 4" x 6" and 5" x 7" Flip Books, 5" x 7" Paperback Custom Cover Books, and some neat-looking Picture Me Photo Books where you put a photo of your child's face in the character of the book.
Building the Book
Like most of the Web-based book-building tools, the first step is to upload your images. Unlike most of the Web-based tools, Snapfish offers two choices for uploading: an optimized upload appropriate for prints and photo books, and an original resolution upload for larger prints. The default is the optimized upload, so I opted for that. The optimization process is quite effective: it took 15 seconds to process a 12 MB JPEG file, and only three seconds to upload it. This is on a 3.2 Ghz Core 2 Extreme CPU, where the optimization process is only using a single core, but it uses 99% of that one core. This isn't a process you'd want to initiate on your netbook, that's for sure.
Figure 62: Uploading your images.
After the upload completed, which took less than 10 minutes, the Snapfish Web site presented me with options to order a coffee mug, a greeting card, or a photo book. I selected photo book, and was taken to a page where I could select the type of photo book I wanted. Opting for the 8" x 11" size, the next step was selecting from among the 56 photo book designs. Lots of choices! The next step was to select the type of cover, and choices included leather, linen, custom dust jacket, and a custom cover. When you select a custom cover, you then select from the type of cover - a full-cover image, a collage, or several other choices. The final part of this stage was clicking on Create...and that launched the browser-based tool for building the book.
After loading the Flash-based book-building tool, I was immediately prompted to auto-fill the book. Curious to see if this actually worked, or if it was a complete disaster like it normally is when I've tried this option in other book building tools, I selected yes. It was exactly as bad as I expected. It didn't respect the order of my photos - even though they're all named in sequential order - and worse, it assumed that I wanted multiple photos to a page. Thankfully, there's an undo button - but just once I'd like to see an auto-fill function that asks you if you want to auto-fill based on full-page layouts, asks for your front and back covers, then auto-fills based on file name. That would save so much time when building a book!
Figure 63: Building the Snapfish book.
Building the book was a fairly straight-forward affair. My uploaded photos showed up on the right, the blank pages of the book were in the middle, and below that there were options for page layouts, backgrounds, and photo borders. You simply drag your images from the right over to the blank page on the left. Unfortunately the default isn't full-page, so after dragging the image over you need to go into page layouts, find the full-page layout option, and drag and drop it onto the page to have your image cover the page. It's a bit tedious, but it works well enough...except for the frustrating bug where I'd drag and drop an image onto the page, only to have it be the same as the image next to it.
I'd click on the image I wanted, then drag it over to the page, dropping it - and watch as it loaded as a completely different image. Some pages took me five drag and drop attempts before it loaded the correct image. There's also the bug where you'd select an image by clicking on it, then proceed to drag and drop it, and have it not be "picked up" for dragging and dropping. And, let me tell you from experience, it's pretty frustrating when you get to the end of a 60-step drag and drop session, made into a 240-step drag and drop session due to glitches, only to find that you somehow have more images than remaining pages. I had to go back twice to get fix errors from having the same image on multiple pages, and some of those pages with the wrong images caused the whole order of the book to be incorrectly set. Building this book was a little frustrating - Snapfish needs to take a hard look at the bugs in their software.
Figure 64: Problems saving.
Like most Flash-based book-building tools, the Snapfish tool has a Save function - but after clicking it and waiting more than five minutes, I saw the above error. Thankfully, the next time I tried, the book was saved. Adding more pages is a simple one-click affair per page, but sadly the new pages don't match the layout of the pages before it, so every new page added was a combination of photo and text blocks. That meant several minutes of clicking and dragging the full-page layout option onto each newly created page, one at a time. And you sensing a theme here? So much clicking and dragging!
Figure 65: Selecting my cover. Really? No full-page photo for the front and back cover?
Figure 66: The best I could do. At least the front cover is full-page...
Clicking and dragging I can live with, but what I didn't like was what Snapfish considers a "custom cover". Every other company that has offered this option has allowed me to select a custom front and back cover. Strangely, Snapfish allows a great full-page custom cover, and printing on the spine, but on the back cover you only get a tiny image and room for two lines of text. Why not a full-page image on the back? No idea. Worse, if you want a full-page front cover, the back cover has to be white. If you want a black back cover, the front cover has to be an image inside a frame that doesn't fill the whole page. I found this frustrating, and I'm not sure why Snapfish is unable to deliver something that nearly every other big player in the industry can.
Another frustration I had with the cover was the incredibly inaccurate cover preview. If you look at the preview of the cover above, you'll see that there seems to be a large amount of space to the left of the text - so it shouldn't be cut off, right? Wrong. Check out that print preview below.
Figure 67: The Print Preview function isn't very accurate.
When I looked at the print preview, I was shocked to see that the text on the cover was cut off. I printed a copy of the cover on my printer, and sure enough, the cover was chopped off. I emailed my contact at Snapfish and she said they were aware of some bugs with the print preview function. I hoped that the WYSIWYG preview in the book-building tool was accurate and ordered the book.
Artscow is one of the more quirky companies that came up in my search for photo book printing companies; they not only do a limited number of photo book sizes (7" x 5", 8" x 8", 12" x 12"), they also do photo prints on bags, mugs, t-shirts, tote-bags, playing cards, greeting cards, photo watches, CD wallets, folding umbrellas, digital camera leather cases, mini-coin purses, pencil cases, and sleeping masks. I kid you not. They're based in China (Hong Kong), which isn't apparent unless you go digging for info on their site. That plays an important role later in my experience with them (watch the video below to find out more). Artscow is also the only company that talked about their printing press: a Xerox iGen4 Digital Press that apparently sells for $640,000 USD. Sounds impressive, right? Keep reading.
ArtsCow has provided two coupons for Digital Home Thoughts readers to use: 30PBOOK1199 will get you an 8" x 8" photo book, 30 pages in length, for $11.99 each, with free shipping (expires December 31st, 2011). 30PBOOK2499 will get you a 12" x 12" photo book, 30 pages in length, for $24.99 each, with free shipping (expires December 31st, 2011).
Building the Book
Like many other companies in this review, Artscow offers a browser-based tool to customers for building their book. Before you can do anything at all, you need to upload all your images. Unlike most of the others, the Artscow tool is based on Microsoft's Silverlight technology. And, unfortunately, unlike all the other browser-based tools, the Artscow book-builder looks incredibly amateurish. It didn't inspire much confidence in me as a user as to the quality of their end product if this was the user interface they presented to customers. The tool is called "Photobook Designer" and the logo has a gradient that looks like WordArt from Word '97.
Figure 72: The ArtsCow book-building process.
Although it's not much to look at, it does get the job done. I was able to drag and drop my images one by one onto the page - and by default, all the pages are designed for full-page images. That's a nice touch I wish more photo book companies would emulate. Page numbers can be toggled off or on with a simple click, and the performance of the Silverlight-based tool was excellent. It was fast and easy to move images around the page, and swap them with another image via a quick drag and drop. Artscow offers drag and drop embellishments - hearts, buttons, butterflies, etc. - along with page backgrounds, themes, borders, and page layouts. Spine printing customization involves a single click and some typing - another thing more book companies should emulate.
The tool informed me that some of my images were of insufficient resolution for high-quality printing (below 200dpi), which I thought was a bug at first, but after consulting an online PPI calculator I understood. To print at at 300dpi on a 12 inch by 12 inch page, you'd need an image of about 16 megapixels in size. My highest-resolution camera, a Nikon D300, is 12.1 megapixels. Most consumers aren't going to have a 15+ megapixel camera, but most consumers getting 12" x 12" books created are likely doing scrapbook-style layouts with multiple pictures to a page. My use of full-page images is a bit unusual. There's also an unfortunate bug in their system that sorts images in the album in reverse. So BOOK-060.JPG was listed first, and BOOK-001.JPG was listed last. This meant that the autofill function, which would have otherwise worked, filled my book in the opposite order.
After I finished building the book, there was a preview function that gave me a decent idea of how the book would look. Everything looked OK, so I placed the order.
Photobook Canada offers three different styles of photo books: hardcover books with a debossed window, hardcover books with an imagewrap hardcover, and softcover books. Book sizes vary by type, but in general they offer everything from 7.87" x 5.91" up to 12.76" x 10.79", in several aspect ratios including square books. All three of their book types use Premium European 115 lb. silk acid-free paper. That caught my attention because most of the books I looked at user 100 lb. paper at most, and the Photobook Canada paper is from Italian paper manufacturer Fedrigoni. I have no idea what that means, but it sounds impressive, right?
August 2010 Update: With the new version 5.0 of their software, Photobook Canada now supports spine printing.
September 2010 Update: I built an 11" x 11" book with Photobook Canada for a vacation project; check out the full review here.
Building the Book
Photobook Canada uses desktop software, but it was a lengthly 86 MB download at a relatively slow 250 KB/s download speed. Does that file size look familiar? That's right, Photobook Canada uses the My Photo Books software, just like several others in this review. Everything was the same as my other uses of the software, with the exception of the front and back covers. When you drag and drop an image onto the front of back covers, it drops into the layout at whatever size is specified by the page layout. To change the page layout, you go to the Page Layouts tab, pick the layout you want, and drag it onto the page. The My Photo Books software from Photobook Canada lacks a full-page photo layout! I thought at first I was doing something wrong, but I started up the Mpix version of My Photo Books and confirmed that it had a full-page layout option. So why was it missing from the Photobooks Canada software?
Figure 77: Building the photo book using the Photobook Canada version of the My Photo Books software.
I had the same glitch with this version of the software as I did with the Treasure-Book.com photo software, where I'd click on one of the images to drag it into the layout and the selection of the photo would jump to another image. It happened eight times when I was doing the layout for the book, and the only fix was to click over to the Page Layouts tab then click back again to the Book Pictures tab. It was a little wearisome.
Figure 78: Where's the full-page image option for the cover?
The most puzzling thing about building the book though was when I dropped the photo on the cover, I couldn't find a way to make the image take up the full cover. In other versions of the My Photo Books software - the one from Mpix for instance - there's a Page Layout option for a full-page image on the cover. As I mentioned above, that option is missing from the My Photo Books software that I downloaded from the Photobook Canada site. When I contacted Photobook Canada, they said they weren't sure why their version of the software was missing this function, but that I could create the same effect by creating an image frame and dragging it to be the same size as the cover. I managed to make this work, but it was a tedious process that involved a lot of clicking and dragging (especially on the back cover). Wanting the front cover of your book to be a full-page image doesn't seem like a radical concept, so I'm puzzled as to why Photobook Canada doesn't make this easier for their customers.
Similarly, when I asked how to create a caption on the book spine because I couldn't figure out where the feature for that was, I was told I'd have to create a text box, rotate it, and place it at the furthest-left point on the cover. And then what, hope for the best? The problem is that there's no line telling me where the spine fold for the cover is, so I wasn't willing to "wing it" and hope for the best. Even with the PDF preview, there are no layout lines showing the exact position of the book spine. The PDF preview shows trim lines, but guess what colour they are? Black. So on my back cover, I couldn't see the trim lines. I had to be over-cautious then: I dropped in a black background, and make my back cover image smaller than full-page, all to ensure that it wouldn't get chopped off. Can you sense that I found building this particular book more than a little hassle?
After the upload completed, which was fairly quick, I was taken to the ordering page. There are three paper options: Premium Smooth (170gsm/115lb T), Premium Smooth (200gsm/70lb C) at a $6 up-charge, and Matte Textured at a $4 up-charge. Surprisingly, they had two colour options: 4-colour CMYK or 6-colour CMYK plus Light Cyan/Magenta...but on that option it said it wasn't available in the US or Canada. Pretty strange to show the customer something that they can't order! Look up the customer's IP address, and only offer options that are available to them. There were also options for photo book cases and boxes, but they were confusing - a slip case in the US or Canada cost $30, while the same thing in Asia, Europe, Australia or Africa only cost $5. There was no preview of what these cases and boxes looked like.
The Results
Figure 79: The Photobook Canada photo book, front. [HIGH-RES IMAGE]
Figure 79: The Photobook Canada photo book, back. [HIGH-RES IMAGE]
Please click on the video above to watch it on YouTube in 1080p full screen mode.
Book Details: 11" x 8.5", 60 page, hardcover with imagewrap, premium smooth paper (200gsm/70lb C)
Book Cost: $106 CAD + $12 shipping within Canada
Paper Quality: Poor > Average > Excellent > Superb
Print Quality: Poor > Average > Excellent > Superb
Cover Quality: Poor > Average > Excellent > Superb
Overall Quality: Poor > Average > Excellent > Superb
I've seen the name Mpix in photography magazines for years, but have never ordered anything from them. I figured this review would be a good excuse to check out what they have to offer in the way of photo books. They offer photo books in the following sizes: 5" x 5", 8" x 8", 10" x 10", 8.5" x 11", and 11" x 8.5". I chose to build the 11" x 8.5" landscape book. Unfortunately they have a 50-page limit on their photo books, so I had to delete ten pages from my book. Deleting 10 pages from a baby book where every page is precious was quite difficult - it's frustrating that Mpix has this limitation. Their books are printed on 100 pound text stock, pearl, or linen paper. Mpix offers custom printed covers bonded to the outside of the book, and their books start at 20 pages.
Building the Book
Mpix uses the My Photo Books software, so everything I said in the Treasure-Book.com and Photobook Canada segments applies here. The Mpix software client has a red border - and that's about the only difference I could see. I built my book fairly quickly by adding a bunch of pages, then dragging and dropping each image onto the page and selecting Single Page Background. The software had some bizarre moments of sluggishness, but overall it performed fairly well. Once the book was completed, I selected the Send to Mpix button, and the software created two PDF previews for me: one PDf of the front and back covers, and one PDF of the inside pages. The PDF previews show page trim marks, which is great, but they lack a preview of the book spine, so it's guess-work when it comes to determining how close your text or images will end up being to the spine.
Figure 81: Building the book using the Mpix version of the My Photo Books software.
After I approved the PDF files, the software informed me it would open up a browser window and I could proceed with my order. The browser window opened, then asked me to log in, but since I didn't have an Mpix account yet, I had to create one. After I created the account, I clicked around my account, looking for my uploaded book. It was nowhere in sight. Thankfully, the software recognized that something went wrong, so it gave me the option to try again, or to give me an URL to copy and paste into my browser. The lesson here? Register an account with Mpix and log in prior to starting a book project.
After my book had been added to the cart, I saw there was an option for the paper type: stock, pearl, or linen. There was no information on the ordering page as to what the differences were. I opened up another browser window and scoured the Mpix site for any details about the different paper stocks, without any luck. A Google search brought me to a discussion thread where people were talking about the different paper stocks. I opted for the stock paper after reading different opinions about the linen and pearl papers. Ultimately Mpix should offer information and photos of the different paper types.
A day or two after I placed my order, I was notified that there was a problem with my book, but it was caught during inspection. They emailed me to say there would be a slight delay as the book got re-printed. That really impressed me; the fact that Mpix does a physical inspection of the book, and automatically re-prints it if there's a problem, makes them stand out from many of the photo book companies in this review.
The Results
Figure 82: The Mpix photo book arrived in this box. A nice touch!
Please click on the video above to watch it on YouTube in 1080p full screen mode.
Since shooting the video and considering how Mpix stacks up against the competition, I gave them an overall rating of Excellent...as long as you have a project 50 pages or less.
Book Details: 11" x 8.5", 50 page, custom hard cover book
Book Cost: $65 USD + $30 FedEx Next Day shipping to Canada
Paper Quality: Poor > Average > Excellent > Superb
Print Quality: Poor > Average > Excellent > Superb
Cover Quality: Poor > Average > Excellent > Superb
Overall Quality: Poor > Average > Excellent > Superb
Spine Printing: No
Picking the Best Book Maker Isn't Easy
There are a lot of different ways to answer the question of who makes the best photo book, because everyone has different values. Some people may value ease-of-use above all else; others, paper and print quality; while for some, price is king. In light of this, I've broken down the results of this review in a few ways. First, an executive summary of each photo printing company.
Great desktop software that's easy to use, but dark, muddy printing quality and only average paper and cover quality coupled with a lack of spine printing and extremely high prices ($119.59 USD) seal the deal in a bad way. You don't want to order a book from Picaboo. OVERALL RATING: POOR to AVERAGE
Solid desktop software makes book building easy, and the excellent paper quality combined with average to excellent printing quality and spine printing make this a decent choice. The cover quality doesn't quite measure up to others in this review, however - they need to improve the image printing quality. Slightly higher-than-average pricing ($79.59 CAD), but if you live in Canada, shipping isn't very expensive and there's no hassle with cross-border fees. OVERALL RATING: AVERAGE to EXCELLENT
The powerful book-building software combined with a variety of book options - including the superb imagewrap hardcover - make Blurb a real contender. The paper is a little cheap-feeling compared to the others in this round-up, and their $6 premium paper is a waste of money - but Blurb's prices can only be described as "Crazy Cheap!" ($24.95 to $43.95 USD), so there's a lot of value for the dollar. OVERALL RATING: AVERAGE to EXCELLENT
Despite a few bugs, the Web-based book building experience was quite excellent, and the paper and print quality are excellent. The otherwise nicely-done cover is dragged down by the lack of spine printing and the Inkubook logo on the back, but the price is in the same ballpark as Blurb ($42.95 USD), meaning it's quite affordable and well worth your consideration. OVERALL RATING: AVERAGE to EXCELLENT
The Web-based book building process isn't fancy, but it gets the job done with minimal effort. Excellent paper quality and cover quality (along with spine printing) are held back by the average print quality due to the too-warm implementation of their Vivid Pics system. If you've done a good job pre-processing your images, turn off Vivid Pics and you'll likely be quite happy with the print quality. Average pricing ($61.59). RATING: AVERAGE to EXCELLENT
Bringing lay-flat pages to the game at a price point no one else can match, AdoramaPix stands out with superb paper quality and superb cover quality (despite the lack of easy spine printing). The print quality is more of a mixed bag - my test book came with Photo Correction turned on, and the resulting images look a bit muted in tone, though not seriously so. The AdoramaPix books have a real "WOW!" factor that's impossible to ignore. Average pricing ($65.58 USD). The 50 page limit caused me emotional pain, but as of July 2010, they now offer a 76 page option. OVERALL RATING: EXCELLENT to SUPERB
A big-gun in the photo printing industry, Kodak offers excellent paper quality and excellent print quality - but surprised me with restrictions on the front and back covers; you can't do full-cover images, there's no option for spine printing, and there's a big, ugly bar code on the back cover (though the bar code will be removed by summer 2010). Fairly expensive ($74.59 USD). OVERALL RATING: AVERAGE to EXCELLENT
Although fairly expensive compared to some other options, MyPublisher has top-notch print quality and excellent default paper. Their reproduction of my photos was flawless in every version of the book they printed. It's also worth noting that their paper is better quality than basically every other paper I saw, short of the upgraded paper from Photobook Canada. MyPublisher has also upped their game since I first wrote this review, now offering photo finish covers, lay-flat pages, and the insanely great-looking super gloss printing. It's still generally cheaper to go with AdoramaPix for lay-flat pages, but MyPublisher supports books up to 100 pages in size, and discount coupons radically change the cost comparisons (especially if you're doing more than one book). OVERALL RATING: EXCELLENT to SUPERB
A middle-of-the-road offering with average paper quality, average print quality, and less than stellar cover quality. Every other book came to me with a black and white cover; the SnapFish cover was tinged purple. Spine printing is a plus, but the lack of flexibility with the back cover is irksome. Expensive ($69.79 USD) given the quality you get, and the Web-based system is buggy. OVERALL RATING: AVERAGE
ArtsCow might use excellent-quality paper, but everything else about their photo book falls into the poor category. They offer spine printing, but the front cover has horizontal streaks running through the image, the back can't have a custom image, and the interior printing is less than impressive. The images have horizontal lines going through them, and given the average cost of $64.99 USD, ArtsCow isn't a good choice for someone who cares about quality. Their Web software is fast and easy to use, but looks like it was created as part of a high-school computer science project. It's worth noting though that the $65 price does get you a 12 inch by 12 inch book, so if you need to go big on a budget and don't care too much about quality... OVERALL RATING: POOR
Boasting the nicest non-lay flat paper in this whole review, Photobook Canada makes an extremely high-quality book - the printing is excellent, the cover is excellent (despite the lack of spine printing). You pay for it though, with a book cost of $106 CAD, but the cost can be mitigated by good coupon code. Their software is capable, but needs work; the back cover images on my book were nearly printed right off the edge. If quality is what you care about the most, this company is worth considering - just be careful with that back cover. OVERALL RATING: EXCELLENT to SUPERB
Mpix impressed me when they caught a printing error and re-printed my book, but their 50 page limit forced me to make the hard choice of cutting out 10 pages from the baby book. That's not cool - and neither is the lack of spine printing. On the plus side, excellent paper and excellent print quality - along with a price of $65 - make a compelling offering if you design your project from the start to be no more than 50 pages. Mpix uses the same desktop software as several others here, which is a good thing - it's capable. OVERALL RATING: AVERAGE to EXCELLENT
Which One Did We, the Parents, Pick?
Since the impetus for this review grew out of my dissatisfaction with the books I received from Picaboo, my wife and I have spent quite a bit of time looking at each of the books. At the final stage of this review, we looked through all of them and selected the one that we wanted to put on our coffee table. Which one did we pick? If Mpix and AdoramaPix were able to print all 60 pages, I guarantee it would have been down to those two - so that tells you what I think of the overall quality of both, even if both books lacked spine printing. They're both excellent, but I don't want to show people a truncated version of the baby book, so they were out of the running immediately.
Picaboo, ArtsCow, Snapfish, and Shutterfly, were also off the list immediately due to print quality issues. The Photobook Canada book was excellent in every aspect except the back cover which looks like a printing mistake, and the perfectionist in me won't allow that to go on display. The Blurb offerings all looked nice, but the paper quality simply didn't measure up to the better quality books - and they're a bit physically small compared to the other books. MyPublisher? An excellent all-around book, but both my wife and I strongly prefer the photo-wrap covers instead of a dust jacket (which they now offer). The Treasure-Book.com photo book cover just didn't measure up to the rest, despite excellent paper and good printing. Kodak Gallery prints a great book, but because of their page size I didn't print the baby book with them - and I'd have wanted to use my own cover anyway.
Figure 85: The "winner" through the process of elimination.
Who's left? Inkubook. Though there's no spine printing, the excellent paper quality and good-quality printing make for an impressive book. The logo on the back isn't too big, and it boils down to this: when I pick up the Inkubook version of this baby book and flip through it, I feel like it's a good representation of the effort I put into creating the book in the first place. That's about all you can ask for, right?
APRIL 2011 UPDATE: If I were doing this review over from scratch, I suspect I'd end up picking MyPublisher as the all-around favourite. The addition of the photowrap cover and new super gloss paper/lay-flat page options changes everything.
JULY 2014 UPDATE: I've used Photobook America a couple of times, and their overall quality is great, and the cost isn't bad as long as you use a coupon (which is easy).
When Family Members Weigh In...
Beyond my own opinion of book quality, I wanted to get some outside opinions of the photo books. I laid them all out on a table and asked my mother and mother-in-law to look at the books and select their favorites. When this review is finished I'll be giving them each a copy of the baby book, so I wanted to know which ones they liked the most. I was expecting a fairly cursory examination, but instead I got a 20 minute surprisingly in-depth effort from Mom #1 and Mom #2. They looked at every aspect of the books; cover quality, spine printing, print quality, and paper quality. I didn't mention price to them. Mom #1's top three picks, in order, were Mpix (#1), AdoramaPix (#2), and Snapfish (#3). Mom #2's top three picks were AdoramaPix (#1), Photobook Canada (#2), and the Blurb imagewrap hardcover (#3). I found it interesting that AdoramaPix was the only pick in common with both moms (or proud grandmas!); the lay-flat pages were a big plus with both of them. Once you factor in the fact that both AdoramaPix and Mpix only contain 50 of the 60 pages from the baby book, Mom #1 ends up with the SnapFish book, and Mom #2 ends up with the Photobook Canada book.
Factoring in Cost: Whose Book Offers The Best Value?
I had the luxury of getting a bunch of copies of this baby book for this review, but the average person is going to pay for every copy, so book cost matters. If I were a mathematically-oriented person, here's the part of the review where I'd create a scatter graph and plot intersections between cost and quality. Since I barely passed high-school math, here's the written breakdown instead:
If your book project can fit in 50 pages, MyPublisher, Mpix and AdoramaPix represent extremely high quality, with surprisingly affordable prices. You can't go wrong with any of those. If you've got the budget for it, MyPublisher's lay-flat pages and super gloss printing can't be beat.
If your book requires more than 50 pages, or you're on a tight budget, look to Blurb or Inkubook. Blurb is a bit less expensive between the two, but the books are smaller (8" x 10") compared to Inkubook's 8.5" x 11" books that are only a few dollars more. The paper and print quality of Inkubook is superior to Blurb.
If money is no object and you have a big (50+ page) book project, go with Photobook Canada or MyPublisher.
Shipping costs also play a factor; for instance, as much as I like the quality of the Mpix books, they charge $30 shipping to Canada, which is expensive compared to other services. Ditto for AdoramaPix - they charge $24.99 for shipping to Canada (and will claim they don't ship here if you ask). Those of you in the US get less expensive shipping options, and don't have to deal with the brokerage fees that couriers charge when products come into Canada. Factoring in the complexities of world-wide shipping and brokerage fees would have made my head explode, so all I'll say is to do your research before ordering your book (try to get shipments via the US Postal system, which come in brokerage-charge free), or you might be in for an ugly surprise when your photo book arrives.
Here's a cost-saving tip that will help protect your wallet: sign up for an account at all of the book-printing companies you're interested in potentially using, including any newsletters they have, and wait for coupons. I get 2-4 emails a week from the book printing companies in this review, and often there are "2 for 1" or 30% to 40% discount coupons sent out. As you can imagine, a good coupon can radically alter the value proposition - they're worth waiting for.
So Who Makes The Best Photo Books?
As you can tell, there's no clear answer of who's best - each company offers something different, and even if you pick the top six from this review, all six will give you an excellent quality photo book. It all depends on the size of your book project, the budget you have, and which features are most important to you. I hope this review has been helpful, and all the best in your photo book making endeavours. Please leave a comment and let me know how your photo book turned out!
Jason Dunn owns and operates Thoughts Media Inc., a company dedicated to creating the best in online communities. He enjoys photography, mobile devices, blogging, digital media content creation/editing, and pretty much all technology. He lives in Calgary, Alberta, Canada with his lovely wife, his wonderful son Logan, and his sometimes obedient dog. The next time someone mentions the words "photo book review", he's likely going to go into shock and pass out.
Do you enjoy using new hardware, software and accessories, then sharing your experience with others? Then join us on the Thoughts Media Review Team! We're looking for individuals who find it fun to test new gear and give their honest opinions about the experience. It's a volunteer role with some great perks. Interested? Then click here for more information.
__________________ Want to contact me personally? Use this. Want to read my personal blog? Check it out. Want to follow me on Twitter? Here you go.


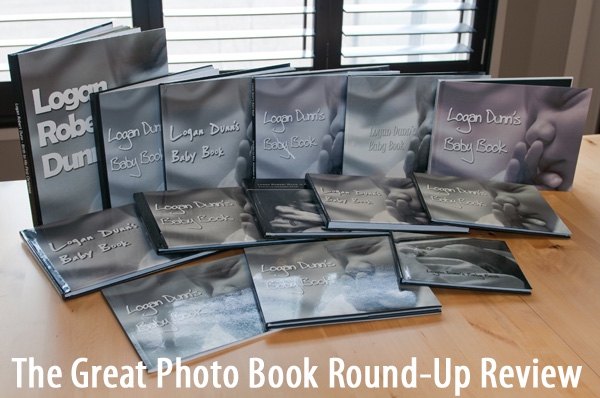
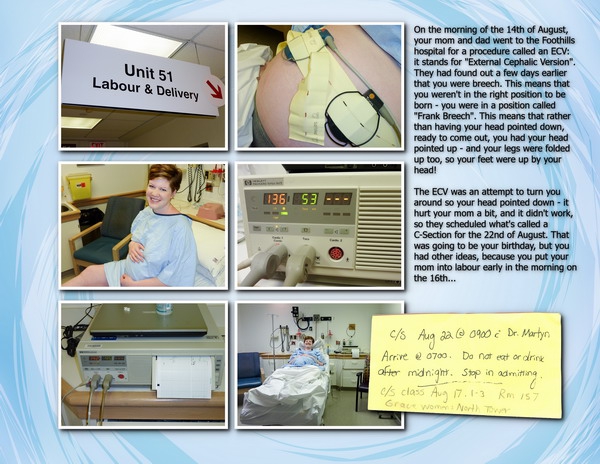

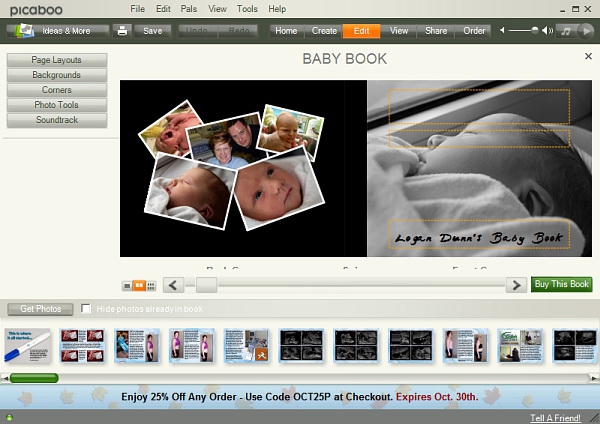
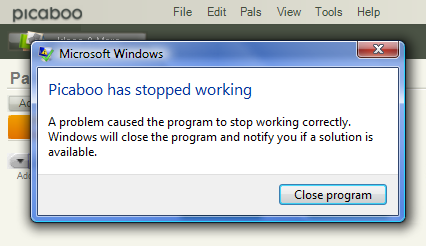
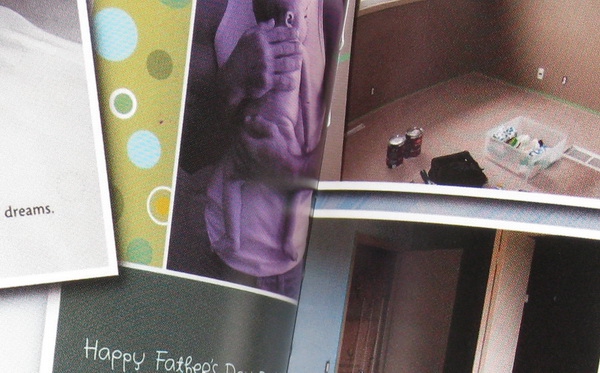
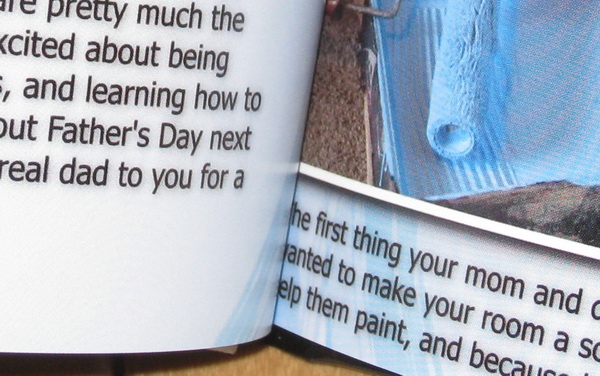
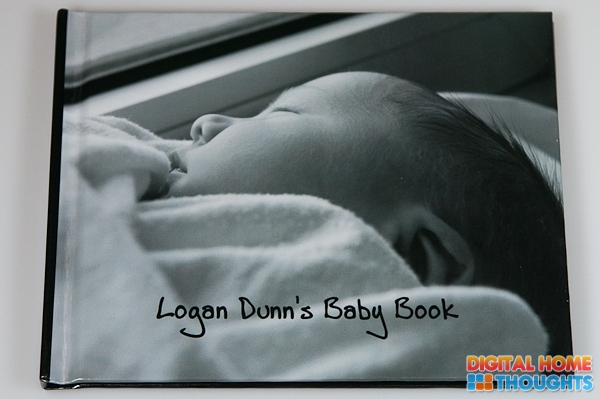
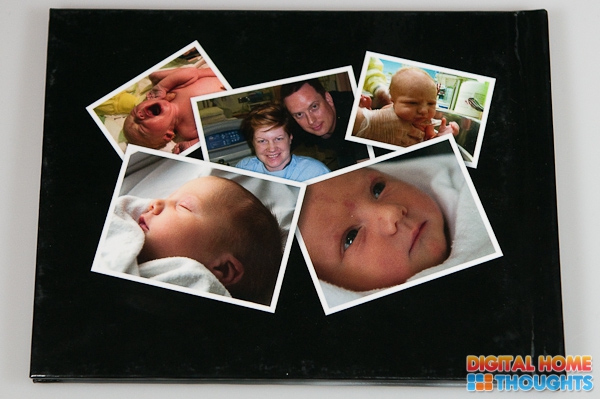
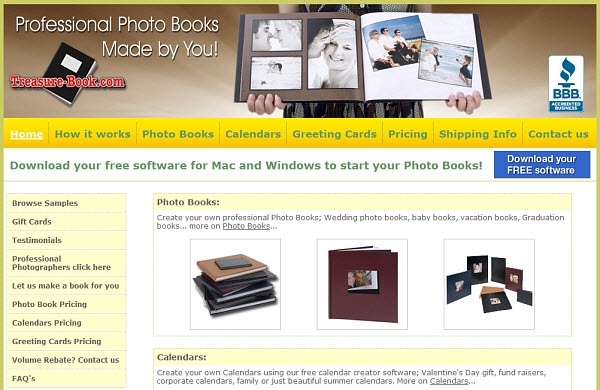
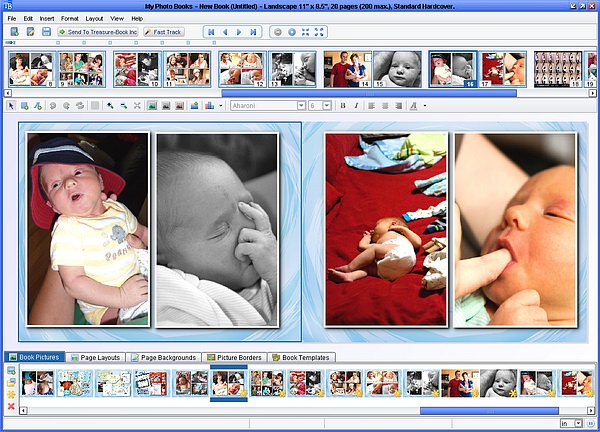
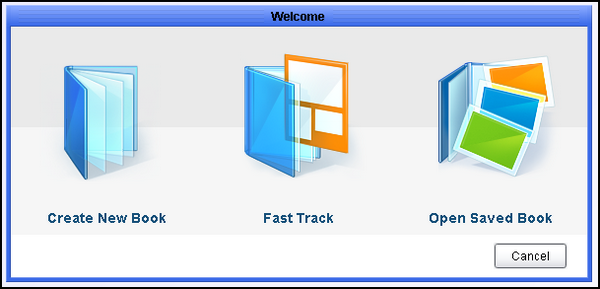
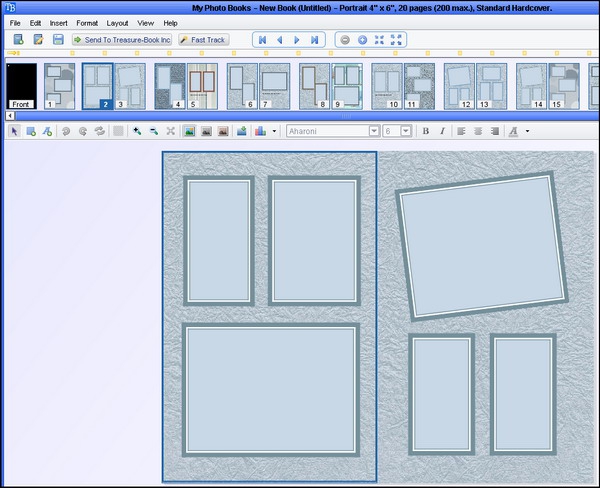
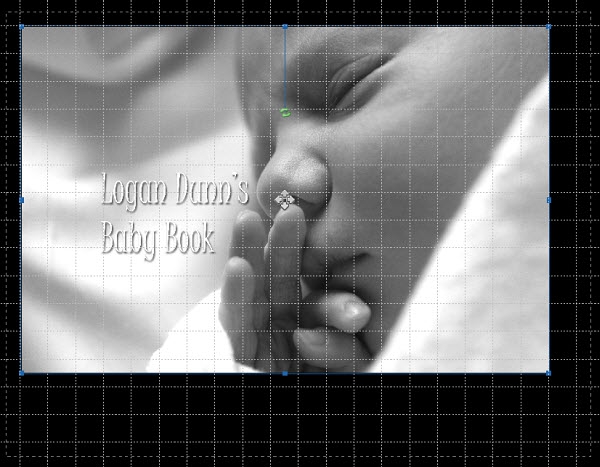
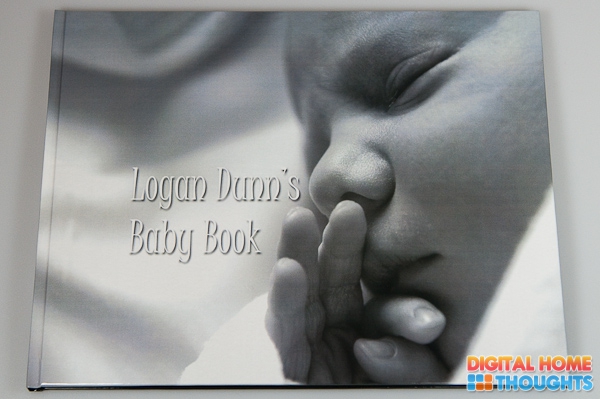
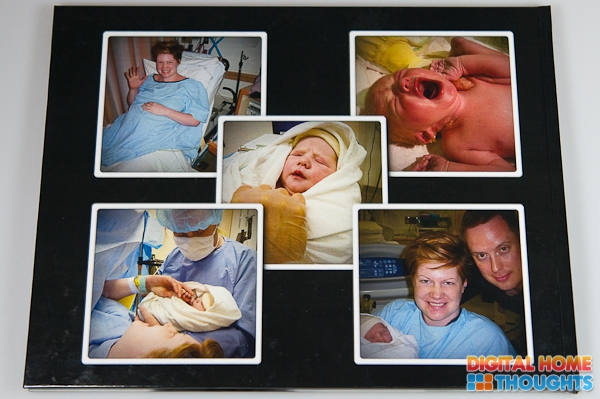
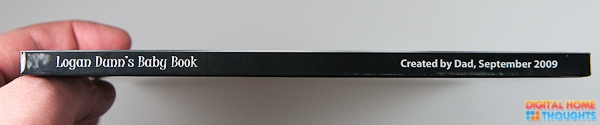
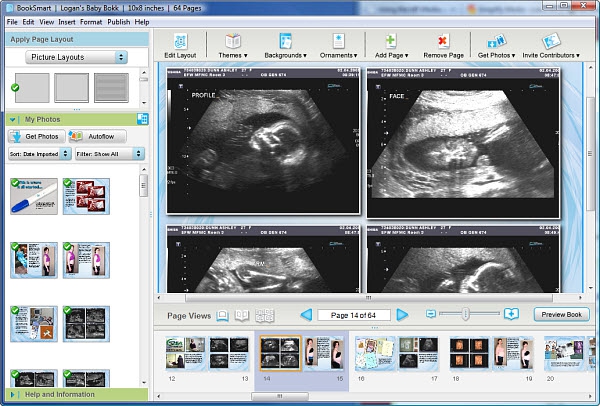
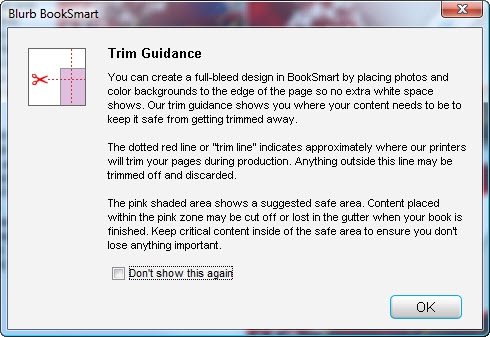
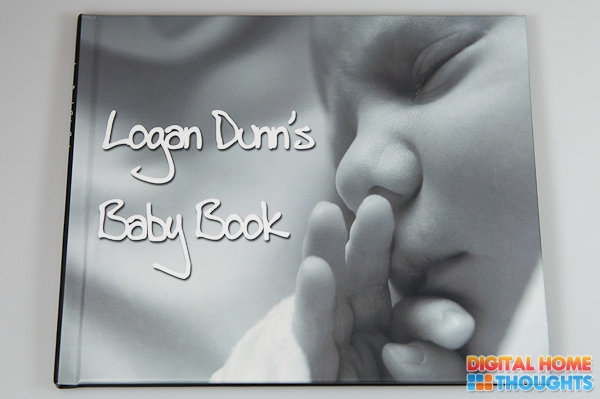
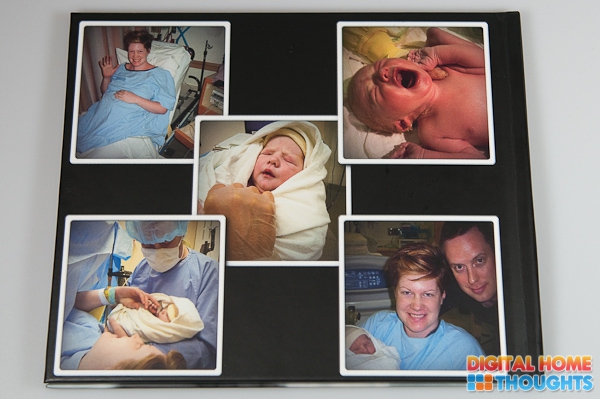


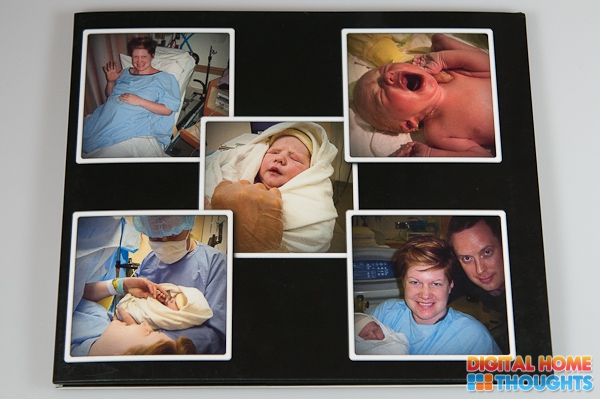

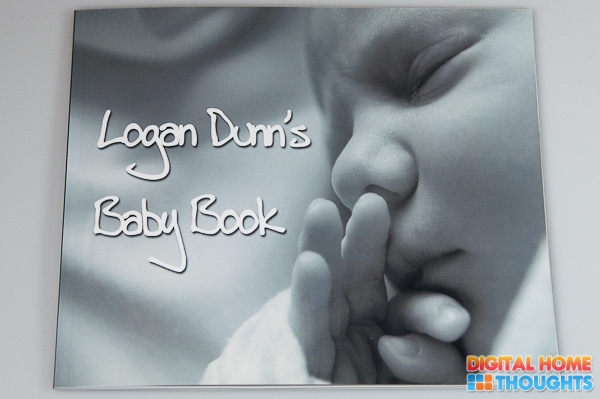
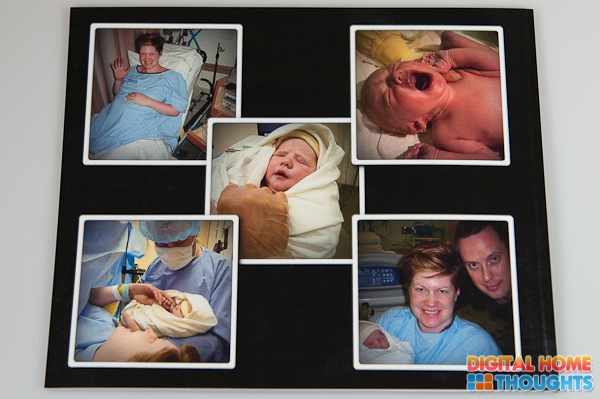

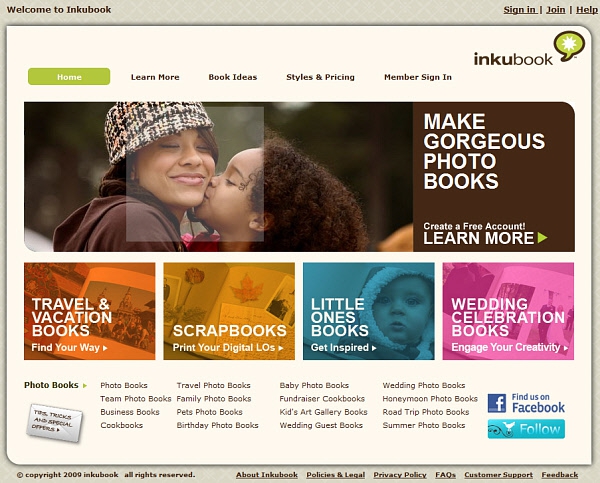
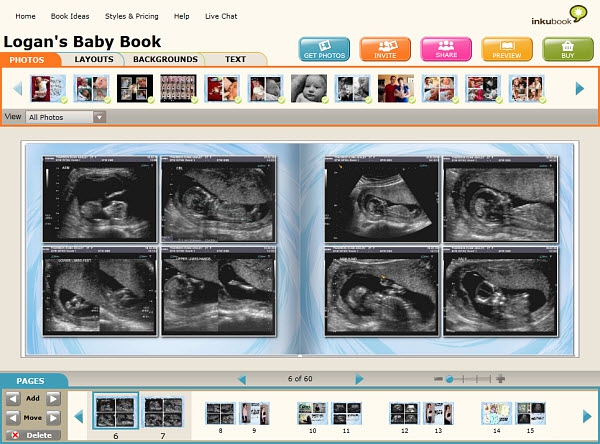

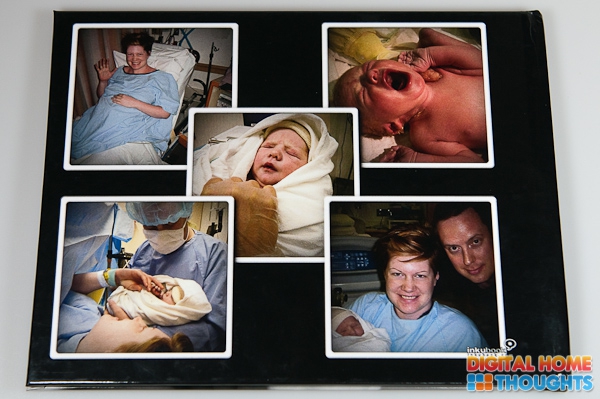
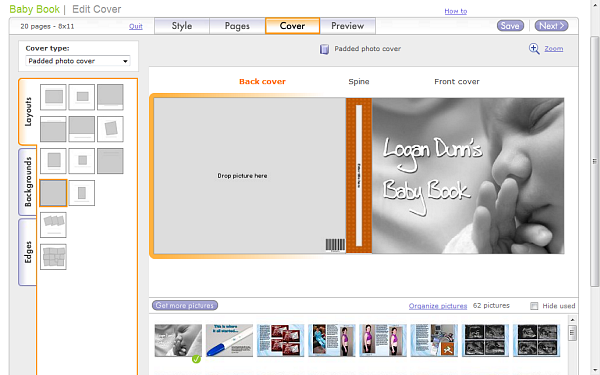

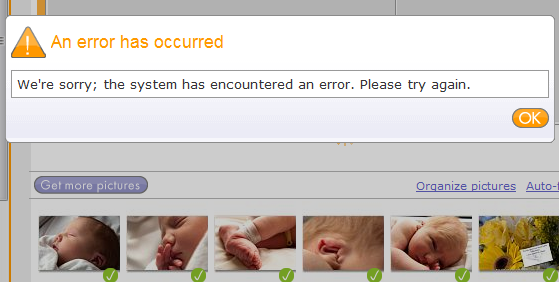
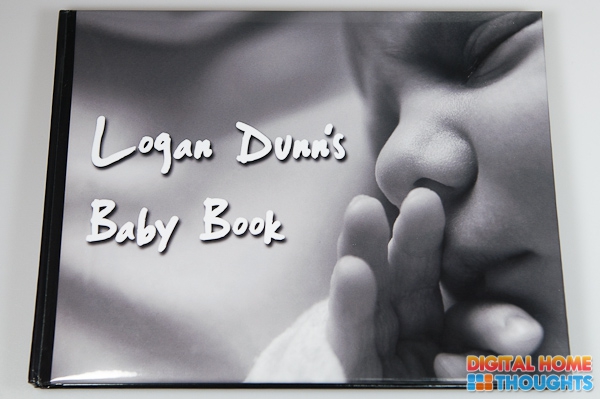
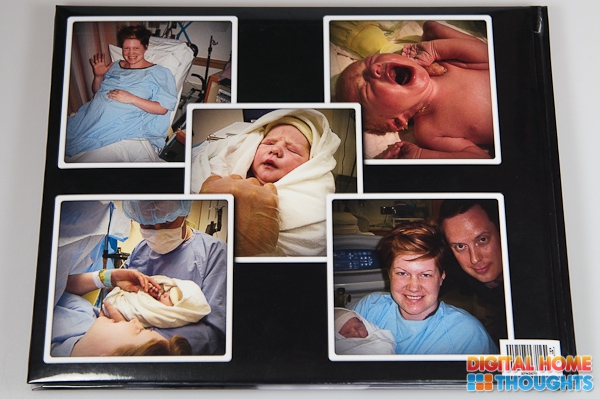
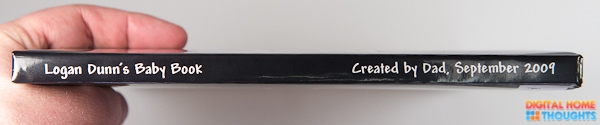
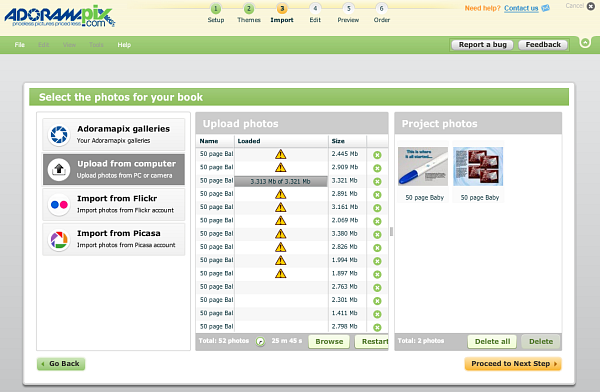
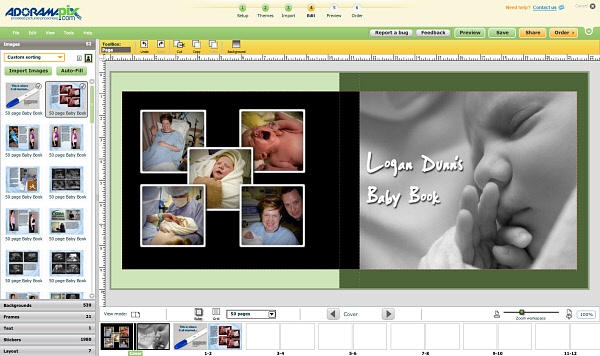
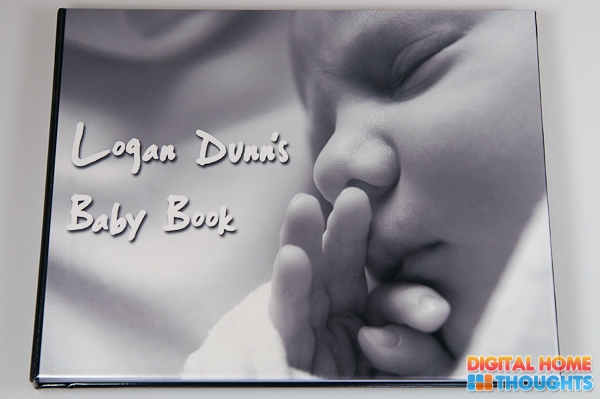
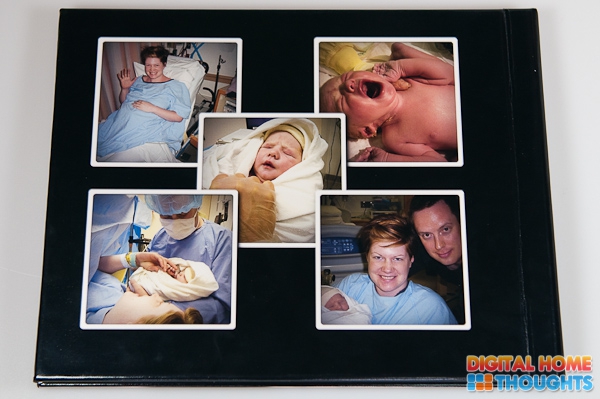
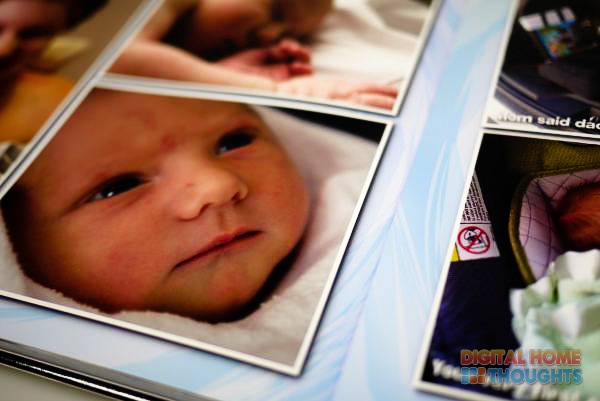
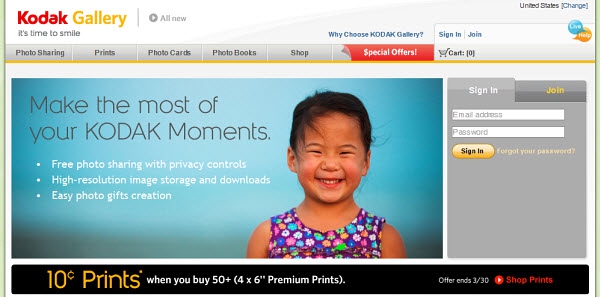
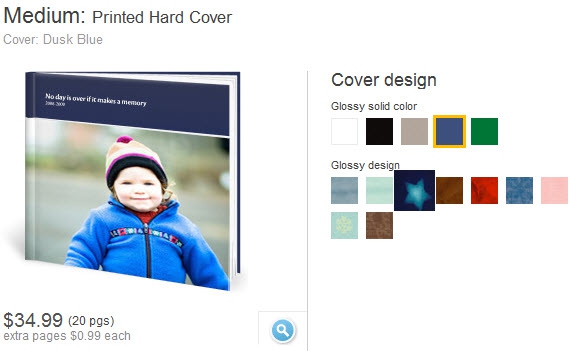

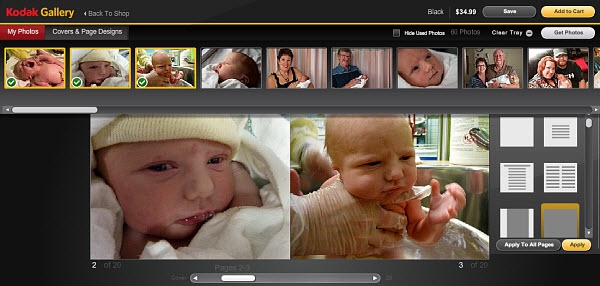
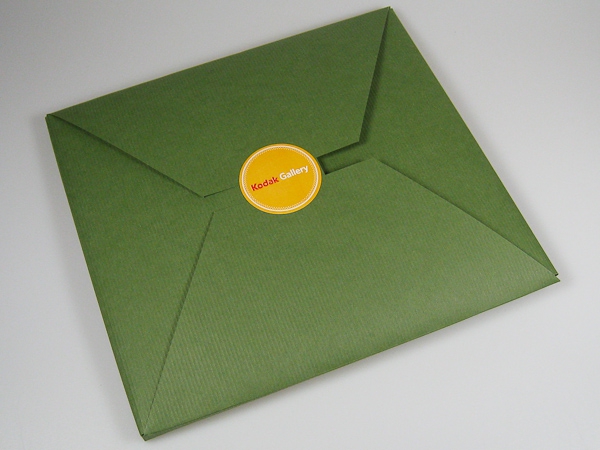
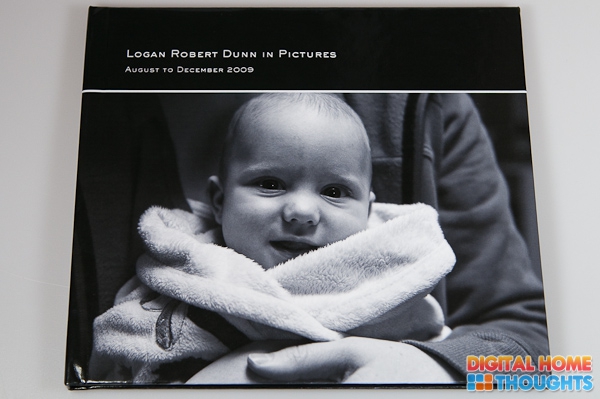
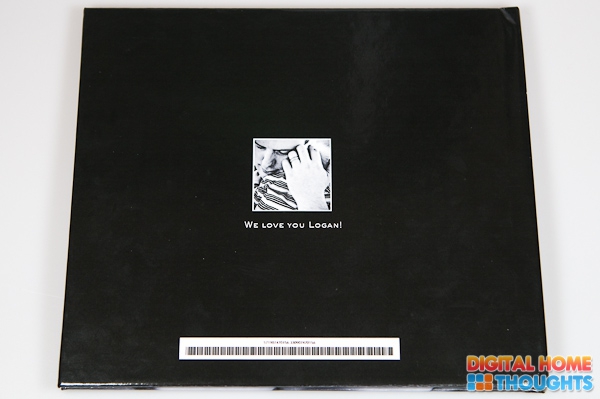
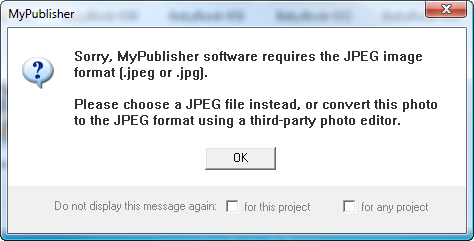
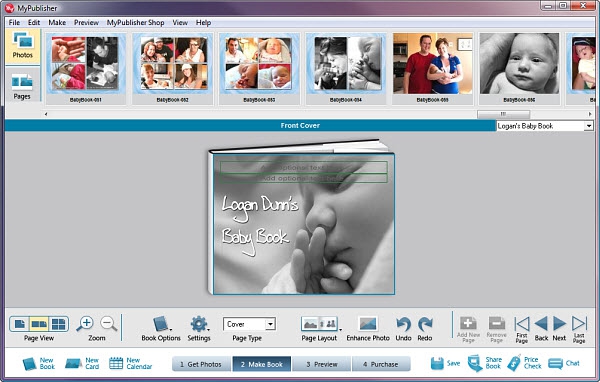
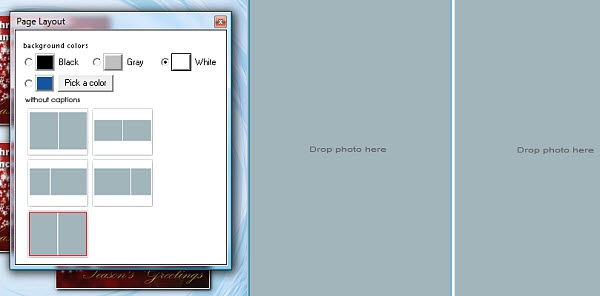
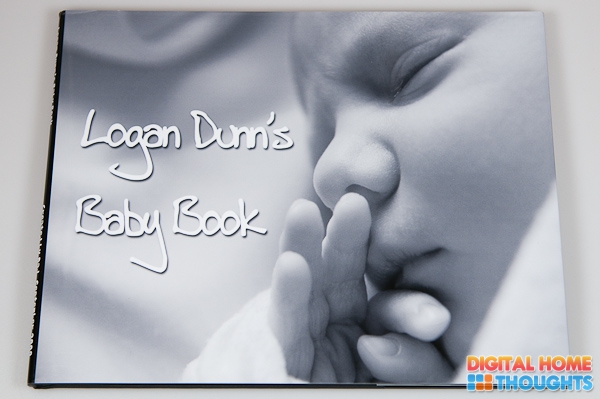

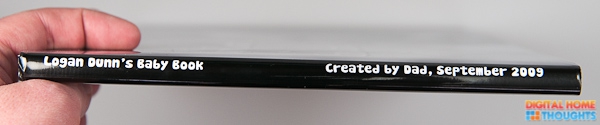
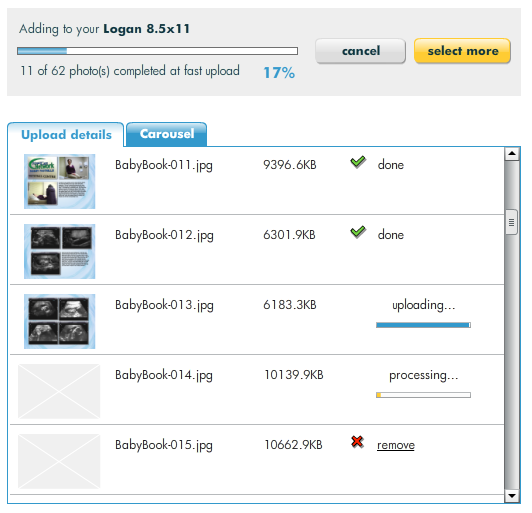
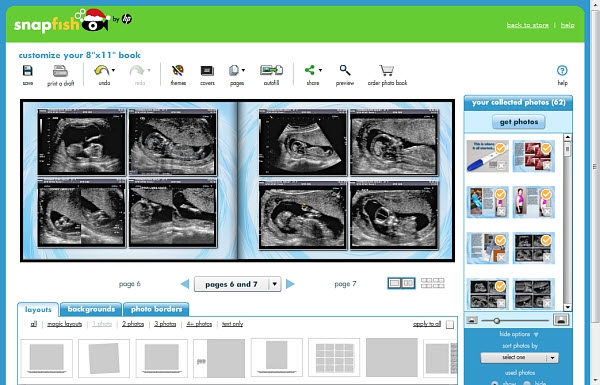
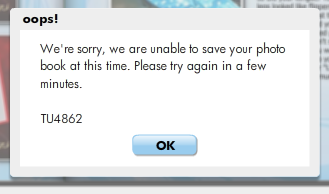
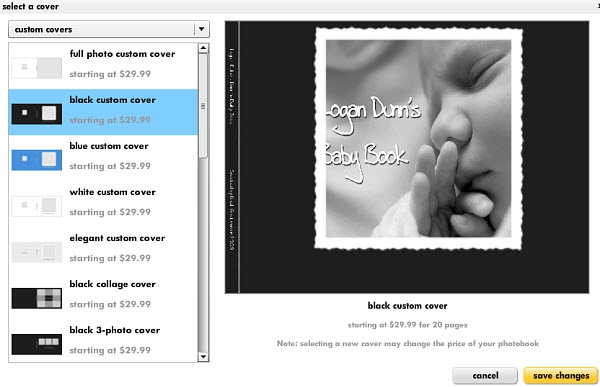

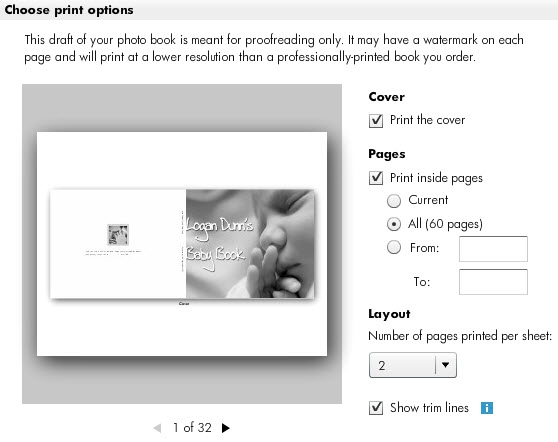
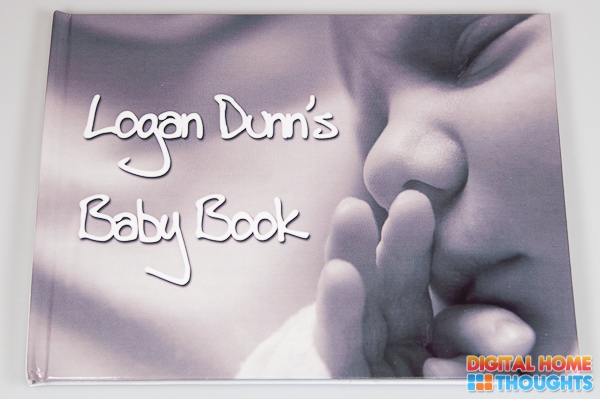
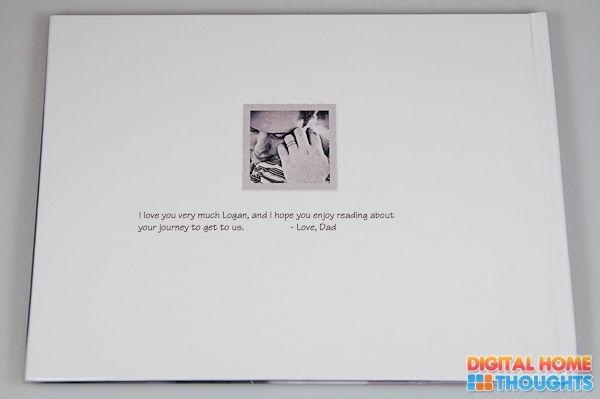


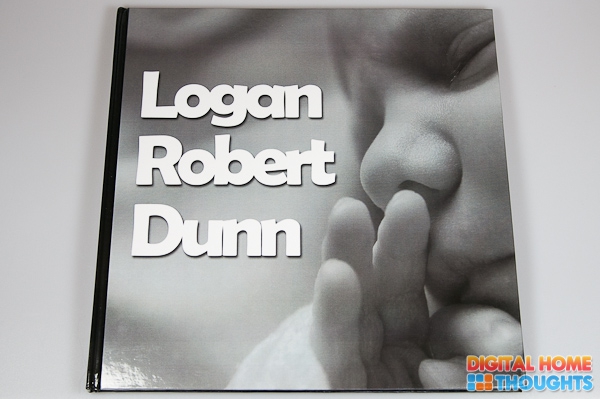


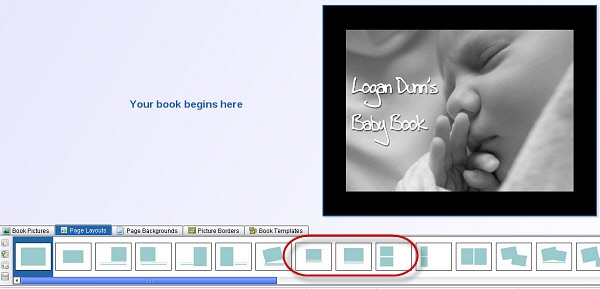
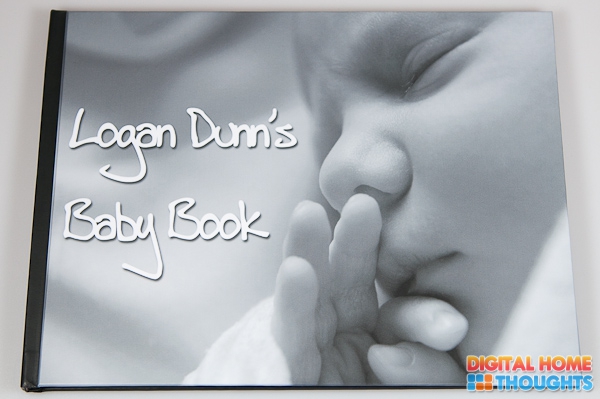
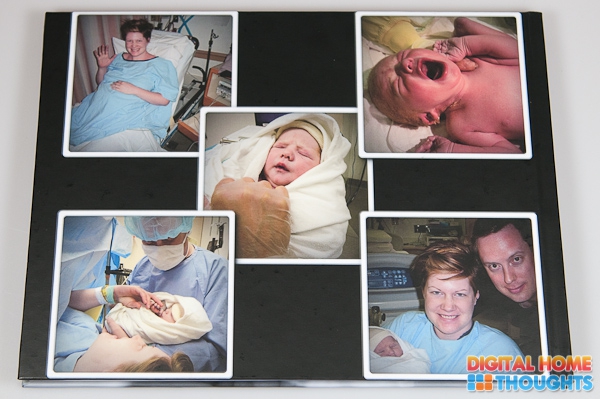

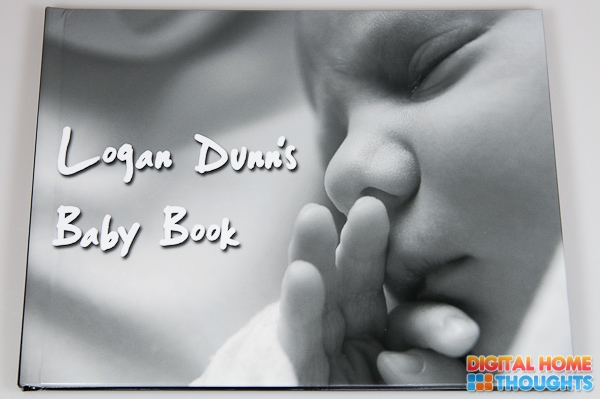
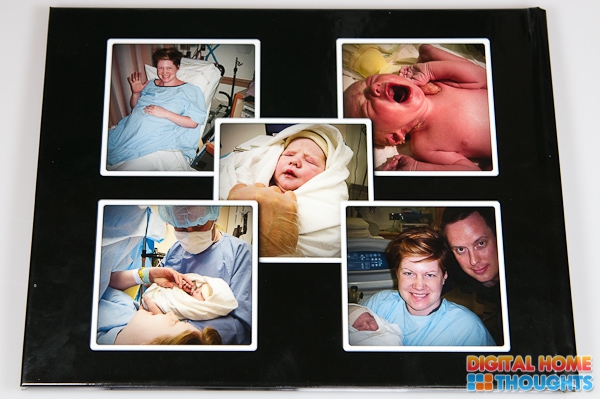
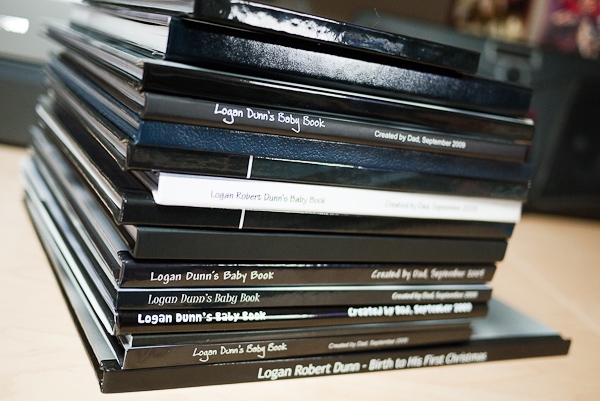


 Threaded Mode