 Adobe Lightroom 2 Delivers A Great Raw Photo Workflow

Product Category: Photo editing softwareManufacturer: AdobeWhere to Buy: Amazon.com [Affiliate]Price: $265.99 USD ($99 upgrade from Lightroom 1.0 direct from Adobe)System Requirements: Windows XP SP2, Windows Vista (32-bit or 64-bit) or OS X 10.4/10.5. 1 GB RAM, 1 GB hard drive space...but if you have a computer with those specs, you probably shouldn't be shooting in raw. Figure on 2+ GB of RAM and a 2+ Ghz dual-core CPU for decent performance.Pros: - Great quality raw photo conversions using Adobe Camera Raw;
- Fast software that scales to multi-core systems beautifully;
- Clearly designed for photography professionals in a hurry;
- Impressive depth of tools for correction, adjusting, printing, and sharing online.
Cons: - Lack of HDR functionality; no duplicate filtering
- Needs a fast CPU and plenty of RAM to really sing;
- No automatic lens barrel distortion correction like DxO Optics Pro offers.
Summary: Lightroom is a photo processing software package aimed at professional and prosumer users. More specifically, it's raw photo processing software. If you don't have a camera that can shoot in raw format, or you're only shooting in JPEG, this isn't the software for you. If you're a photographer who shoots in raw format and are looking for software that will help you develop, edit, process, sort, rank, and export your images, this is among the best software on the market for those tasks and well-worth the asking price. Please note that while this software will work on OS X, I'm reviewing Lightroom from the point of view of a Windows user. I've never used Aperture, so can't offer any comparisons between the two. There's A Reason It's Called "Raw Workflow"Like most photographers, I had to walk the path from JPEG to raw. When I purchased my first DSLR, the first-gen Canon Rebel, I was coming from a digital point and shoot background (the Kodak DC265 was my first digital camera), so JPEG was all I knew and I stuck with it. It took me a while to be convinced that raw images had significant advantages over JPEGs, but even then, I didn't switch until I found software to make editing raw files a reasonable task. My first experiences editing raw images involved opening them up one at a time using the Adobe Camera Raw plug-in for Photoshop Elements. It was a labourious process that simply wasn't practical for the number of images I tended to shoot. So even when I understood the advantages of raw images, I only shot in raw on rare occasions because I detested the work required to manipulate the resulting images. There simply wasn't a good raw workflow that worked for me at the time. When Adobe released Lightroom 1.0 and I saw what it could do, I was immediately hooked – until I saw how buggy and crash-prone it was. Adobe sent me a copy of Lightroom 1.0 to review, but I struggled with getting it to function in a stable manner and kept waiting for "just one more patch" to make it stable. The biggest problem was "out of memory errors" – a curious problem to have on computers with 3 GB and 4 GB of RAM and nothing else running. I experimented with other raw workflow software products looking for something stable, namely DxO Optics Pro, but kept coming back to Lightroom because the workflow was so efficient and the user interface so excellent – even if it crashed now and then. DxO Optics Pro in particular is an example of a powerful raw processing engine hampered by a grotesquely dysfunctional user interface – it's just awful in my opinion. Lightroom 1.0 became rock solid in terms of stability around update 1.4 - which took far too long to happen - but then Adobe released Lightroom 2 shortly after and suddenly my review of 1.x was moot. Lightroom 2 is incredibly stable for me and I haven't had a single crash on either system I've installed it on after several months of use. On the other hand, a friend of mine also uses Lightroom 2 and said that until version 2.3 there was a bug that would cause a crash upon exporting images that were fixed with the Adjustment Brush. Performance Counts, and Lightroom DeliversIf there's one thing I find frustrating, it's when I'm using software that doesn't properly leverage the hardware investment I've made. This usually comes in the form of software that doesn't utilize, or only partially utilizes, multiple CPU cores on my system. Adobe was paying attention to people like me, because Lightroom is multi-threaded from top to bottom: on my Core 2 Duo laptop (2.2 Ghz), both CPUs will be firing, up to 90%, when importing raw images. When you move from raw image to raw image in full screen mode, multiple threads kick off to render the preview – I've seen up to 95% of both CPU core in use. And when it really matters the most – exporting your raw files to JPEG, DNG, etc., Lightroom aggressively uses both CPU cores for the task. It's equally capable on quad core systems, peaking at 99% CPU usage. Multiple tasks can also be performed simultaneously: while exporting 250+ JPEGs I started an export of 250+ RAW files to a catalog, and both processes completed without a hitch. That’s some smart software! I also tested it on a Dell XPS Studio computer, equipped with an Intel Core i7 920 CPU running at 2.67 Ghz and 6 GB of RAM. The Core i7 CPU has four cores, and each core is hyper-threaded, so software can potentially use up to eight threads. When doing an export to JPEG, I never saw the CPU go past 63%, so Lighroom is leaving some performance on the table for Core i7 users - but the Core i7 is so powerful you probably won't notice. What about speed of use with the application itself? I have Lightroom configured to import images and create a year, then month folder. I think I'm a bit different from most Lightroom users in that I work on one or two groups of images at a time, then I'll export each group of images as a separate catalog and archive them on my Windows Home Server. Because of this, I can't speak to the performance of Lightroom with huge image catalogs. The most I've had loaded in Lightroom at once is around 5,000 images, but I didn't find it felt sluggish in any way. Adobe has done a lot of work to keep it feeling fast, and there's an option to re-optimize the database when it starts to feel slow. I wonder if the guys on the Lightroom team could pass some speed along to the guys on the Photoshop Elements and Premiere Elements team? Also worth noting: the EULA specifically allows for installation of Lightroom 2 onto both a desktop PC and a laptop. It's great to see companies realizing that it's rare for digital photographers to have a single computer in this era, and software should be useful in both a desktop and mobile environment. As far as I can tell, Lightroom 2 doesn't use any DRM or require product activation - it's great to see Adobe treating Lightroom customers like we're honest rather than shackling us with DRM and product activation like we're criminals.
The Lightroom Modules: Your Raw WorkflowThere are five modules that make up Lightroom 2, and the easiest way to review the program is for me to go through each module and give you a breakdown of what each offers and how it works from a raw workflow standpoint. The Library Module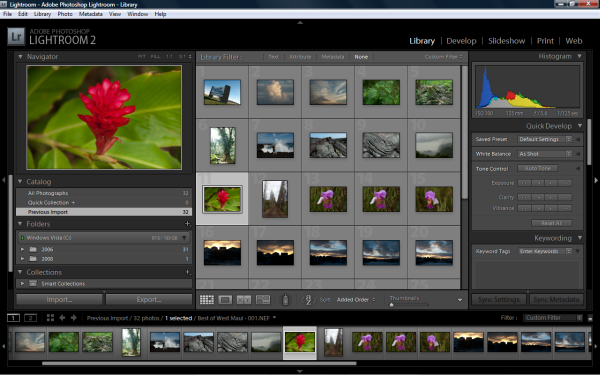
Figure 1: The Library module is where you start your Lightroom journey. The Library module is where you get started. Adobe has a system tray tool that monitors storage cards for images, so you can perform an import when that tool detects images, or use the File > Import Photos from Device to grab your raw images. Once you've grabbed your images, they'll show up as thumbnails. From here you can sort, tag, flag, and re-organize your images however you wish. Lightroom is, in essence, a database, so it has great tools for sorting and filtering your images. In particular, one useful initial step when you first load in a batch of images is to go through them and given them ratings (from one star to five stars) in order to help separate the diamonds from the coal. 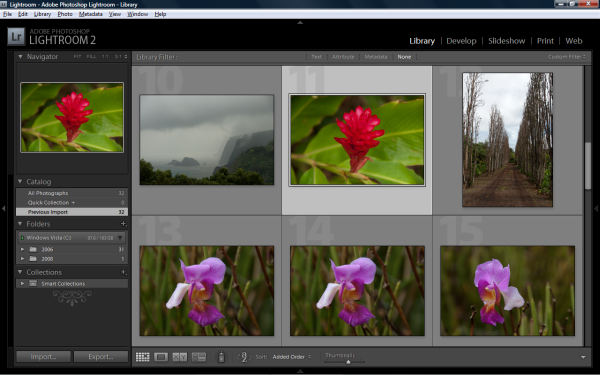
Figure 2: Panels can be collapsed with a single click, and thumbnails can be made very big, or very small. The metadata filtering tools are also quite rich, allowing you to filter out images taken with a certain camera or even a certain lens. Lightroom also has tools for configuring a secondary display on this module, and if you want to take advantage of every pixel possible on your monitor, pressing the "F" key will put Lightroom into full screen mode.
The Develop Module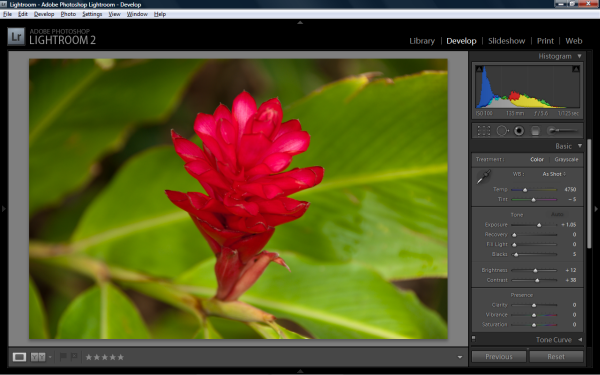
Figure 3: The Develop module is where your raw photos will go from "blah" to "wow!". This is where most of the action happens because it's where your images are transformed with the extensive set of adjustment and editing tools in Lightroom 2. Beyond basic red-eye removal and clone/heal tools, the first version of Lightroom lacked any "real" editing tools – at most you could adjust your image, do some red-eye reduction and clone/healing, and if it needed any editing beyond that you'd open it in Photoshop or another editing program. Lightroom 2 is still no Photoshop (nor would I want it to be) but it does far more than earlier versions. The new editing tools introduced in Lightroom 2 are the Graduated Filter and the Adjustment Brush.  
Figures 4 and 5: On the left, the original image. On the right, the image after a graduated filter is applied (the effect is exaggerated to make it easier to see). Notice that the sky in the top of the image is deeper blue, and the sign is darker, but in the bottom right corner, the building and sky still look the same. The Graduated Filter tool, shown in action above, is a useful tool for adding punch to a skyline – but it can be applied at any angle, so the creative possibilities are endless. As someone who has a folder full of filters, but never gets around to using them, this is a feature I appreciate. The other important editing tool introduced with Lightroom 2 is the Adjustment Brush. In essence, this tool allows you to "paint on" your adjustments. Figure 6 and 7 below illustrate this nicely. I took this photo off the back deck of my house and spot-metred on the clouds bathed in the warm glow of a sunset. The clouds were exposed properly, but it had the effect of under-exposing the row of houses below the clouds, turning them into a black void. 
Figure 6: The original image – the metering was focused on the clouds, which blacked out the houses below. 
Figure 7: The adjusted image – the houses are recognizable now, but the clouds didn't change. To improve this image, I used the Adjustment Brush to paint on a +2 exposure boost to the row of houses and trees at the bottom of the image. The Adjustment brush has a smart selection tool, and a re-sizable brush tip, that allowed me to be quite precise with my fix. It boosted the exposure on the lower third of the image, but didn't impact the orange clouds at the top of the image. The Adjustment Brush can be used to paint on all sorts of effects, including exposure changes, saturation, clarity, colour, and even a "Soften Skin" preset. Below is a more dramatic example of how this great tool can be used. 
Figure 8: My original photo was underexposed, and shot on an overcast, "blah" day. 
Figure 9: 60 seconds later with two applications of the Adjustment brush, the waves and water are a more pleasing colour and the exposure is boosted. That's powerful stuff - though use with caution lest all your images look cartoonish. The Develop module has a huge number of adjustment tools, including temperature (to get that perfect white balance), tint, exposure, recovery, fill light, blacks, brightness, contrast, clarity, vibrance, and saturation. That's only in the basic section - there's the tone curve section, the HSL/Color/Grayscale section, the Split Toning section, the Detail section, the Vignettes section, and the Camera Calibration section. Oh, there's also cropping, spot removal, and the best red eye removal I've ever seen. Suffice it to say that Lightroom offers a staggering array of ways for you to adjust your image. 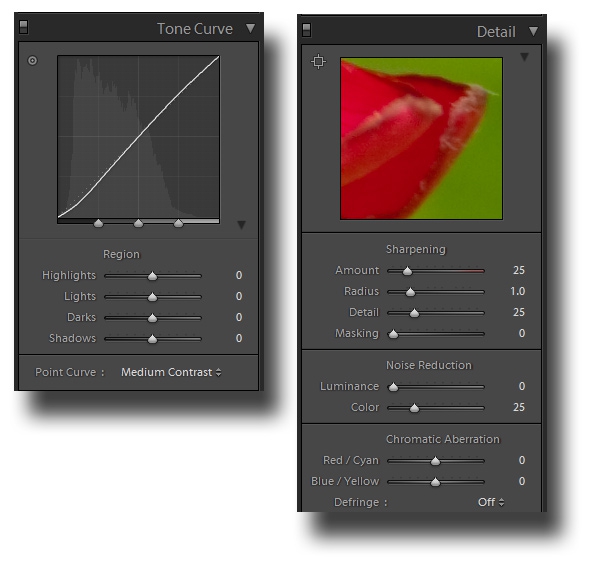
Figure 10: Two section of the development tools are shown above. 
Figure 11: My kingdom for a clone brush rather than that little dot! One of the things that image fixing tools lack is a true brush-on clone/heal tool. Instead you get a circle that you can resize and move around. This works great 99% of the time - because you're probably fixing dust spots or complexion issues - but that last 1% is where Lightroom falls flat on its face. In Figure 11 above, you can see that I had something long and thin in the shot, likely a stray hair on the lens, and getting rid of something like that with a series of circles was quite time consuming (one big circle wouldn't quite work). I don't need Photoshop-like masking and selection tools in Lightroom, but something more than the "dot" is needed.
The Lightroom Modules: Your Raw Workflow (Continued)These last three modules are ones that I don't have much personal experience working with - I tend to spend all my time in Lightroom on the Library and Development modules - so my explanations of these modules will be somewhat limited. The Slideshow Module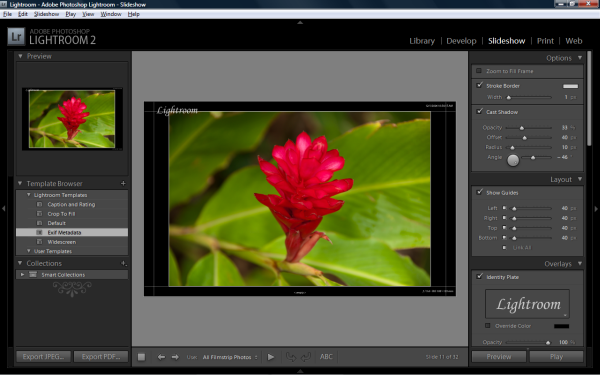
Figure 12: The Slideshow module. The Slideshow module is really aimed at professionals, mostly event and wedding photographers, who need to quickly show clients their photos. You can create customized layouts, changing the background colour or even making it an image. Music can be played along with the slideshow, and while the images are displayed full screen, pressing the numbers one through five will give a star rating to the image - so it's a great way to rate your images, or have your client rate the image. It's a very focused, quick way to do slideshows. If you want something fancier, ProShow Gold is a good choice. The Print Module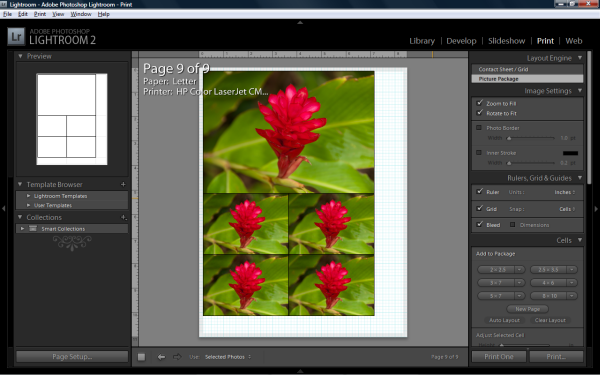 Figure 13: The Print module. You can guess what this module does - it allows you to do all sorts of custom prints. With a couple of clicks you can have contact sheets printed, complete with customization. If you're looking do to prints yourself, this can be a valuable tool to save paper - you can print virtually any combination of sizes. The Web Module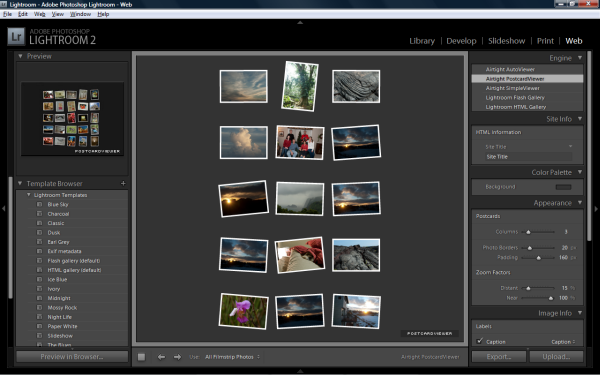
Figure 14: The Web module. Because I've chosen to use Smugmug for my photo hosting/sharing/online printing, I have no need of this part of Lightroom - but if you have a Web hosting account where you can upload HTML files and images, you can use Lightroom to create a broad array of online image albums. Lightroom comes with 17 templates for different types of albums, and there are free templates available online to expand your selection. The usual customizations are available here, but it's important to understand that while Lightroom will crank out albums, there's no automatic way to link multiple albums together, so this isn't a great tool for creating a whole photo site. It's more of an "I just shot this event, here's where you'll see the photos from it" type of solution. It does have integrated FTP uploading, which is a nice touch. I've created a sample output album for you to check out, creating using the Airtight Autoviewer preset.
Shortcuts and Speed Enhancements GaloreOne of the great things about Lightroom is how heavily optimized it is for a fast-paced workflow. You can tell that this was designed by people who understand that every unnecessary mouse-click and keystroke is a waste of the user's time. That's not to say that this software requires memorization of arcane keystrokes; every function is available using the mouse or menu, but as you use the software more and discover they keyboard shortcuts, it becomes even faster to work with your images. 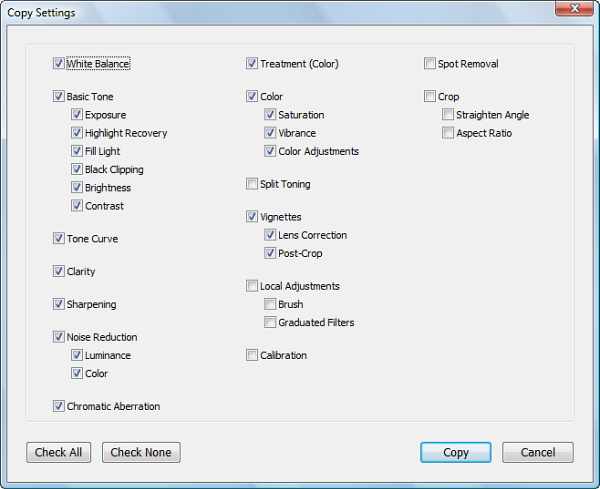
Figure 15: The Copy Settings window gives you a great degree of control. One great example of this is the keyboard shortcut for Copy Settings. Let's say you have a batch of images where a dozen images were shot under the same lighting conditions, but the first image needed extensive adjustments before you were happy with it. With most image editing software, once you finish with the first image, you go onto the second one, re-doing all the same work. Not very efficient, is it? With Lightroom, you simply press Control + Shift + C and the Copy Settings window appears. From this window, you can select which image adjustments you want to copy – and every image adjustment you can think of is there. Once you've set the adjustments, you go to your next image and press Control + Shift + V to paste the settings onto the image. You'll see your plain raw image transform to match the image you pulled the settings from: exposure, contrast, brightness, tone curves, and even local adjustments such as brush and graduated filters. Odds are you'll need to do some fine-tuning to the image, but it's a huge time-saver to be able to clone those settings from one image to another. Adobe Lightroom 2: It's The One to BeatLightroom 2 is a deep product - I've only skimmed the surface of much of it. I didn't dive into the fact that, just like Adobe Photoshop, Lightroom can accept presets (similar to Actions). There are lots of great places to find free presets, all you have to do is look - there are also some commercial packages as well. Presets are a good way to quickly change your images, and especially if you're just getting started with Lightroom, they can be a good way to understand how the many sliders changing will impact your image. Is Lightroom 2 missing anything? Sure. Two of the features I'd like to see in the next major version are HDR (high dynamic range) processing, and automatic lens barrel distortion similar to what DxO Optics Pro offers. HDR photography is all the rage now - whether or not you like the look - and a tool like Lightroom is the perfect place to do HDR work. I've yet to purchase a software bundle for HDR because I'm not sure which is the best out there - I think Adobe should buy up the best tool out there and integrate it into Lightroom and save me the trouble! The best way to experience what Lightroom has to offer is to set your camera dial to raw, shoot some pictures, and download the 30 day free trial of Adobe Lightroom 2. If having great quality images and saving time is important to you, the $265 USD price tag is well worth the investment. Lightroom earns my highest recommendation and is the best tool for raw photo processing that I've ever used. Jason Dunn owns and operates Thoughts Media Inc., a company dedicated to creating the best in online communities. He enjoys photography, mobile devices, blogging, digital media content creation/editing, and pretty much all technology. He lives in Calgary, Alberta, Canada with his lovely wife, and his sometimes obedient dog. He loves a good raw workflow! 
Do you enjoy using new hardware, software and accessories, then sharing your experience with others? Then join us on the Thoughts Media Review Team! We're looking for individuals who find it fun to test new gear and give their honest opinions about the experience. It's a volunteer role with some great perks. Interested? Then click here for more information.
|


 Threaded Mode