IntroductionYou know, I never thought I'd ever have to apologize for living in Canada, but apparently we have been relegated to third-world status by our cellular service providers. Imagine, almost a year now, and we STILL don't have the iPhone available -- nor unlimited data plans (at least for GSM PDAs). Sooooooo unfortunately, my only experience with iPhones has been what I've read in books or seen from afar, in the hands of American and European friends. In the meantime however, developers for the Windows Mobile have been hard at work building gesture-based interfaces into their applications and the Microsoft MVPs have been hinting very broadly that WM7 will have iPhone-like gesture capability built into the O/S. So, we were intrigued when Makayama contacted us and asked if we'd like to review an application which brings iPhone-type browsing to Windows Mobile. Whether TouchBrowser faithfully mimics how Apple's iPhone browser works, I can't tell you. But let's explore what TouchBrowser can do...
InstallationTouchBrowser is distributed from Makayama as a CAB file only. I guess we, as a Windows Mobile community, are getting more technologically savvy, since more developers are providing this more direct installation method, rather than the Activesync-based versions. It probably also has something to do with the growth in internet connectivity, since you can directly download and install these on your Pocket PC, without having to use a PC as an intermediary. The CAB file is fairly small, at 440kb. For WM6 units, that's all that's required. For WM5, you'll need to also install the .NET framework (2.2 Mb). Similarly for PPC2003, the required .NET framework is 5.5Mb. Once you've installed the application from the CAB file, just tap on the icon installed in your Programs folder and off you go!
A full function demo version is available from the Makayama web site, but it will shut down after 5 minutes of use and you'll have to restart it. Once purchased, activation is quick and simple -- consisting of inputing an activation key provided by Makayama.
 Figure 1: TouchBrowser's initial screen. Note that, unlike the defaults in IE, TB's Home Page is set to Makayama's URL (which looks suspiciously like MSN Mobile), so TB will immediately attempt to connect to the internet. Watch out, if you don't have a data plan with your cellular provider!
Unfortunately for Makayama my current phone of choice is an HTC TyTNII (Tilt) running WM6.1 which has HTC TouchFlo installed. TouchFlo is HTC's version of embedding basic gesture-based support across multiple applications, such as Pocket IE, their media browser and some others. In earlier versions of TouchBrowser, having TouchFlo installed and operational caused clashing of the two gesture-reading applications. Typically, it would show up as sluggish response in TouchBrowser, or gestures causing unexpected results. In this latest version of TouchBrowser (1.1.3), a parameter setting has been provided to disable TouchFlo. It's not dynamic, so If you do this, you need to soft reset the unit before it takes effect.
Using the BrowserTouchBrowser is, for all intents and purposes, a replacement for Pocket IE. You run it like any other program – from either a menu selection or from the Programs folder on the device (where it loads by default). Like IE, it opens up on the home page, which comes preset to a news page (similar to MSN.com) on Makayama's web server. The default home page can be adjusted via the settings (see above), which is accessible from the Toolbar icon at the top of the screen. Normally, TouchBrowser opens up in 'desktop' viewing mode, which means that each web page is displayed at full size and you manipulate a virtual window which hovers over a portion of the page. As you'd expect, this window can be dragged around using your finger or you can flick to move to directly to any one of the edges. Automatic scrolling only appears to work vertically however, but it goes at a reasonable pace and is easily stopped with a tap of the finger on the screen. In this desktop mode there are navigation aids available (by pushing the centre button on the D-pad) to show you where you are on the page. These consist of small grey bars at the right side and bottom of the screen.
 Figure 2: Navigation aids for Desktop display mode.
These grey bars move up and down (at the right side of the screen) and left and right (at the bottom of the screen), kind of like the indicators in scroll bars. I found these a little difficult to understand at first, but after a couple of minutes playing, I got the hang of them. There is also a mobile mode available, which basically does the same thing as
Single Column view in PIE, reformatting the page to one long column the width of the screen. Page rendering and navigation speed seemed pretty similar to PIE. At the bottom of TB's screen is status bar, which provides information on page loading, navigation, etc. via text. I miss having PIE's progress bar though, since it at least lets you know that things haven't frozen. Unfortunately, most web pages are not yet designed for gesture-based navigation, so my fat fingers kept activating links when all I wanted to do was look further down the page. Mobile news sites with list of links to other stories were especially bad.
If you touch and hold on the screen, a pop-up menu is presented which provides a number of functions for manipulating the display, including selecting all the text on the page; refreshing the page; and zooming the page in and out by changing the relative font size of the text (note: this feature is only available under Windows Mobile 6.1).
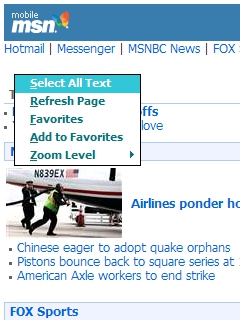 Figure 3: The pop-up menu activated by tapping and holding on the browser screen.
Selections from this menu also let you access and manage your Favorites. One of the neat integration features Makayama has included is that TouchBrowser and PIE share their Favorites list so that changes made in either are reflected in the other.
Other Settings
In TouchBrowser, the Navigation D-pad is definitely your friend. Much of the functionality you'll require to configure and use TB is located on the toolbar, which is only made visible by pressing the up/top button of the D-pad.
 Figure 4: The functions assigned to the navigation D-pad on your PPC. The Show Menu / Hide Menu options access TB's toolbar.
  Figure 5: TouchBrowser's Toolbar.
TouchBrowser's toolbar is where you access most of the configuration functions of the browser. The tools (from left to right) consist of:
- Previous Page (back) – also available on the left button of the D-pad
- Google Search – not to be confused with the Help function normally associated with a question mark
- Enter a URL to go directly to that page.
- Close the program (a TRUE exit).
- Go to TouchBrowser's Settings screen.
- Switch between Desktop and Mobile view.
 Figure 6: When you tap on the ? in the toolbar, it launches a Google keyword search screen. Not exactly what I was expecting when I first starting testing TB, but handy to have available.
 Figure 7: Selecting to go to a specific URL. When you tap the down arrow button in the top right corner, TB provides a list of the last 10 URLs you visited.
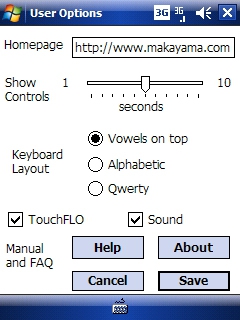 Figure 8: TB's settings screen.
At TouchBrowser's Settings screen, there are a number of options to affect the look-and-feel of the browser. As mentioned before, here is where you set the default homepage when the browser is first started. The Show Controls selector lets you set how long the toolbar is displayed after you press the centre button of the D-pad. Examples of the various keyboard layouts available are shown below. The TouchFLO selector determines (I believe) if TouchFLO is enabled on your PPC or not, but the documentation wasn't really clear about this. If you select Sound, then TB will play a little beep each time it responds to a touch gesture. The Help button takes you to a display of the manual available from the website. When you click on Save, TB will remind you that the changes will not take effect until after a soft reset of the system.
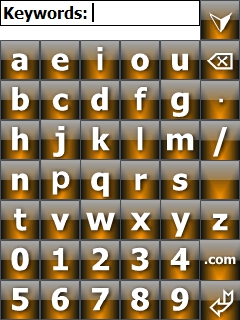
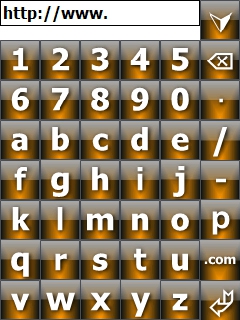
Keyboards TouchBrowser provides 3 keyboards for user input (in addition to the ones normally provided in the Windows Mobile O/S). The first is a full screen alphabet with the vowels placed in the top row.


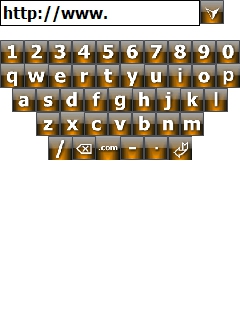


 Linear Mode

