System Requirements: SD or SDHC memory card required; suggested 8G minimum.
Specifications: NTSC/PAL recording to 5MP CMOS sensor; 10x optical, 100x digital zoom; 2.7 in (68.5mm) touch LCD screen; auto/manual focus; comes with built-in Intelli-Studio software for PC. Full specs are here.
Pros:
Able to record in full (1080i) HD (1920x1080) using h.264 format;
Small and lightweight -- easily fits into a pocket or purse;
Can take photos 'on the fly' without having to switch out of video mode.
Cons:
Have to open up the screen to use the camera;
Can't see HD results without purchasing a separate mini-HD cable or downloading to the PC;
May be able to hear zoom and autofocus mechanisms in quiet situations.
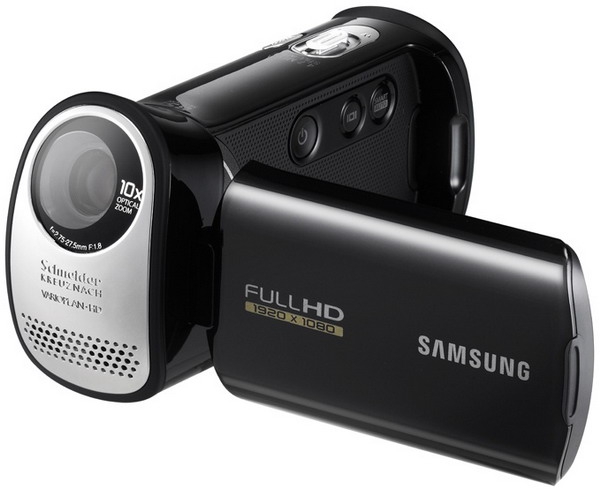
Summary: The days of tape for video recording have long disappeared -- replaced by small, handheld devices which record directly to memory cards. The earliest versions gave us convenience, but only standard (480p) resolution, but now we are starting to see even smaller cameras which are capable of full HD recording. The HMX-T10 is Samsung's latest offering -- combining full HD capability with simple, lightweight operation.
Introduction
It's been quite a while since I went shopping for a video camera. The last one I bought was a Canon ZR850, a miniDV cassette unit which our family still uses (for now...). It's been good to us -- replacing a much bulkier Sony DV cassette unit we had before that. It seems that I'm quite a bit behind the times, since when I started to do a review of a new video editing application, it very quickly let me know (in no uncertain terms) that I was working with antiquated technology. I won't bore you with the details. Suffice it to say, when Samsung offered to let Digital Home Thoughts take a look at their latest HD camcorder offerings, I jumped at the chance!
The HMX-T10 is a relatively new addition to the Samsung line here in Canada, and represents its latest generation in handheld camcorders.
Video camcorders have come a long way in the last 10 years. I can remember the days of shoulder-carrying a 5 lb monster capable of 480i at best (before we called it that)! Now, with cameras like the HMX-T10, we have 1080i that fits in the palm of your hand, a pocket or a purse -- and the only moving parts are the telephoto zoom and autofocus mechanisms. It certainly makes bringing the videocam along for those special moments a lot easier.
What's in the Package
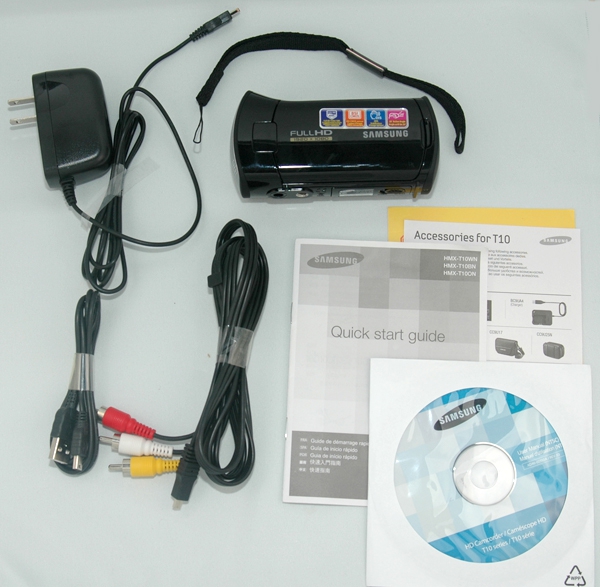
When I got the box with the T10, I was immediately surprised by the weight. At first, I thought they'd made a mistake and forgotten to include the camera! As you can see from the picture below, the package comes with most of what you need to get started.
Figure 1: Here's what comes in the package.
Starting from the top left in the image above is a wall power supply/charger with a proprietary power plug for the T10; the HMX-T10 camcorder itself; documentation for the camera, including a quick start guide for installation of the battery and storage card and the user manual (in PDF format) on a CD; a composite video/audio cable to display output from the camera; and a mini-usb to USB cable for connecting the camera to the PC.
The big omission here is a storage card, which is required to actually use the camera. The camera takes SD or SDHC cards, so I was able to buy a cheap local (Walmart) 8G microSD card with an adaptor and it worked just fine.
The Quick Start Guide is the usual 'international' version with pictures and no words to supposedly make it clear how to initially set up and use the camera. While the pictures were pretty good for getting the battery in and charged, and finding out where to insert the memory card, they really didn't help much in figuring out how to use the various functions of the camera. I had to resort to printing off the User Guide on the CD.
Ease of Use
So, what's the camera like to use? Generally pretty simple and straightforward, and the results are quite reasonable. Let's start with a walk around the unit.
Controls Layout
So let's start out with a walk around the unit to see where things are located.
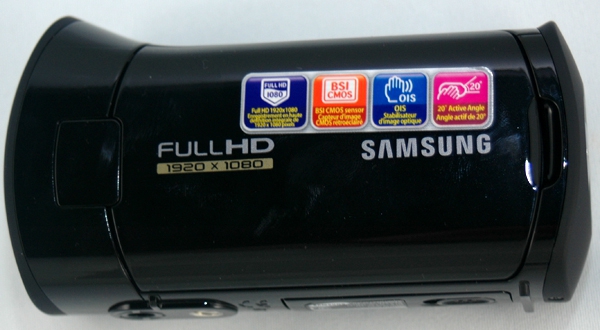
Figure 2: On the left side of the unit is where the flip out screen is located (under all those 'feature' decals). Unfortunately for left handers, there's no way to use the camera comfortably -- it's designed to be held in the right hand.
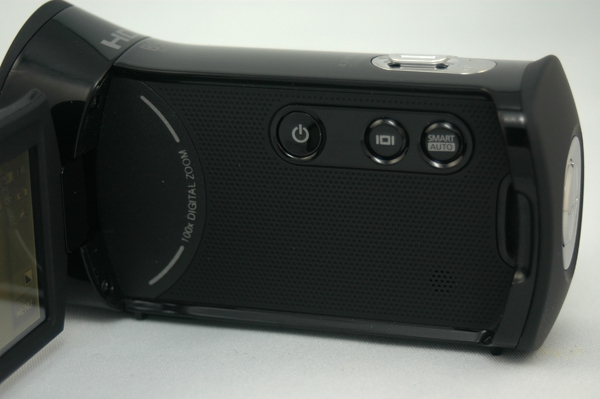
Figure 3: Behind the screen are buttons (from left to right) to turn the power off for the camera; toggle the information provided on the display; and put the camera in 'automatic everything' mode.
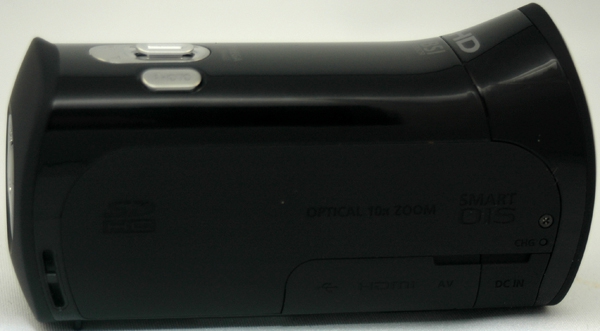
Figure 4: There's not much on the right side of the unit, except for the A/V and power access ports in the lower right, and the anchor for the lanyard strap on the lower left.
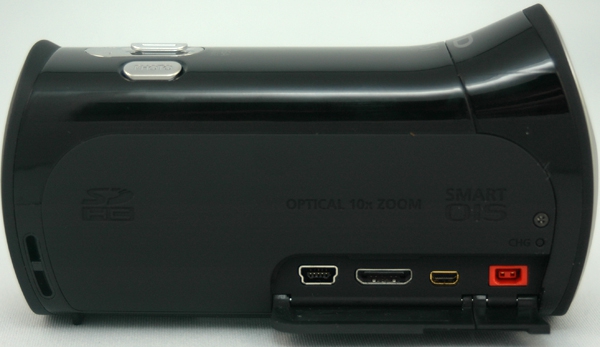
Figure 5: The doors over the access ports flip down with a solid click and stay in position, which makes things much easier. From left to right we have the mini-USB port for connection to the PC, a mini-HDMI port for displaying the camera's video on a HDTV, a port for connecting the composite video cable provided (for standard definition TVs) and the power/charging jack in red. Note that you can open the power/charging port door separately.
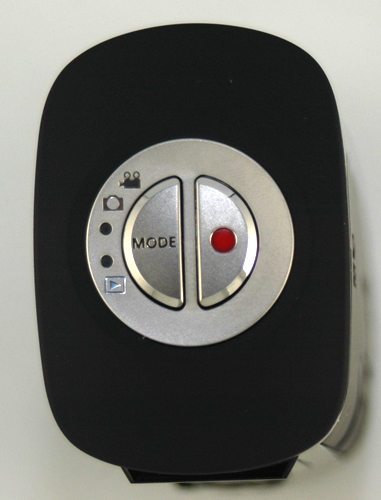
Figure 6: On the back of the unit, there are two buttons - real simple. The MODE button is a bit different in that it switches between camera and player modes (as opposed to video and still), and there are two blue LEDs to the left of the MODE button which display whether you are in camera (upper) or player (lower) mode. The Red button on the right is for turning off recording mode.
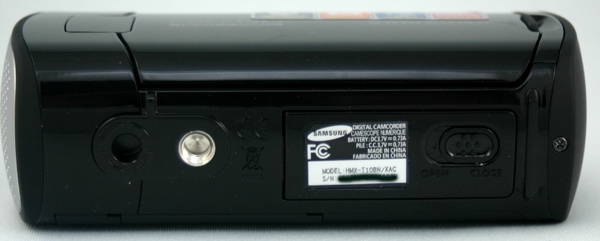
Figure 7: I'm not exactly sure what the hole at the far left of the bottom of the camera is for, possibly for a mount of some kind. To its immediate right however, is a standard camera tripod screw mount which is great for long duration shots (like school concerts, plays, etc.) or for low light situations. To the right of that is the battery/memory card compartment.
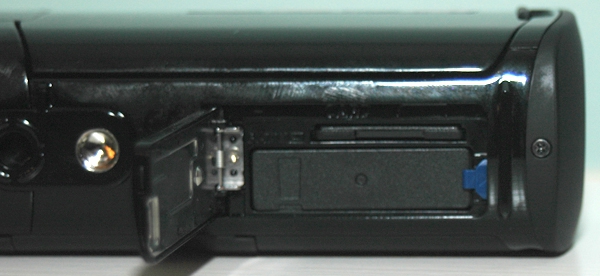
Figure 8: When you open the door on the bottom of the unit, it exposes the battery and memory card slots. The blue latch releases the battery (which slides in). Just above this, you can see the slot where the SD or SDHC memory card fits in. This is the typical press in to lock, press again to release mechanism.
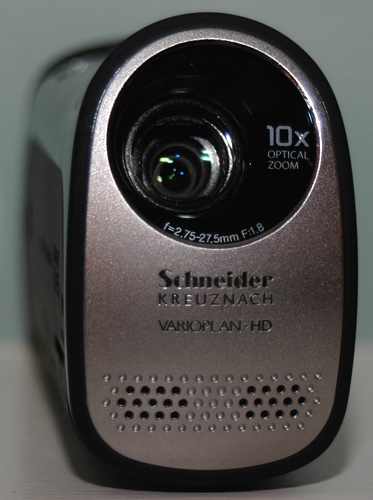
Figure 9: On the front of the camera is the main lens and at the bottom are the openings for the stereo microphones. Fortunately, the lens seems to be recessed quite a bit so that provides some protection. It might be 'old school' by now, but I miss the ability to screw on lens filters (UV, etc) which would also provide protection against cracks and scratches on the main lens.
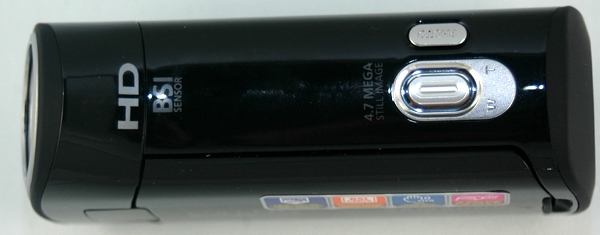
Figure 10: On the top of the T10 are the controls for the telephoto zoom (centre right) and the Photo button (top right). There's duplicated controls for these two functions on the screen as well, whichever you find more convenient.
Weight/Ergonomics in Hand
Boy, is this thing ever light! Weighing in at just over 219g (7.8 oz), this feels even lighter than some of the smartphones I've used over the years. It's a least half the weight of the Canon ZR-850 that our family has been using for the last few years which makes it great for throwing into a pocket or purse without adding a lot of bulk, or having to lug around the camera bag with extra tapes, batteries, etc.
Unfortunately this light weight also causes problems especially with telephoto shots, since there's likely to me more 'jitter' when the camera is held in one hand. Generally, heavier masses are more difficult to move quickly, leading to less jitter, which is the thinking/physics behind most steady-cam attachments -- that by adding more mass at a lower centre of gravity, it will eliminate most of the jitters your holding of the camera.
The other oddity for me was having to to use the screen to view the object, since I was used to through the lens shooting. Samsung actually suggests you hold the camera with two hands (one on the body, one on the screen) which helps to keep things stable, but isn't really convenient for most shooting situations.
The screen rotates approximately 45 degrees in one direction and 180 degrees in the other, so it is possible to watch what you are filming behind you. Unlike other cameras though, when you flip the screen 180 degrees, the picture orientation doesn't flip over, so this can't be used to create a 'left handed' working position.
Comparison to Mini-DV cameras
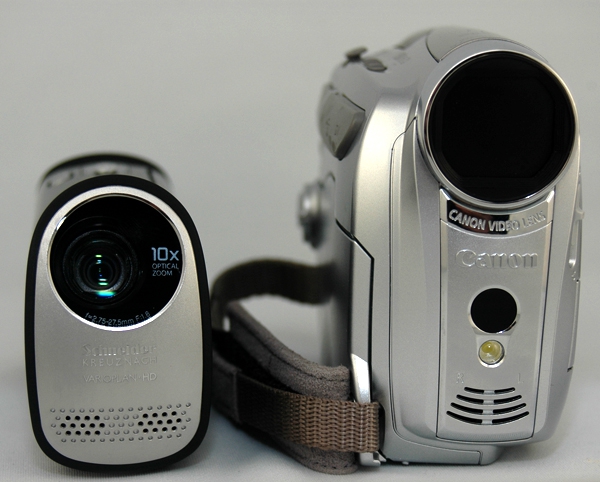
I thought it would be fun to show a comparison between the T10 and my older mini-DV Canon ZR850 to give an idea of how much things have changed. I realize now that mini-DV cameras are almost ancient history (having been informed of such by numerous other resources as I preparing this and another review), but the Canon has been our family standby for a number of years now. And maybe others are in the same situation...
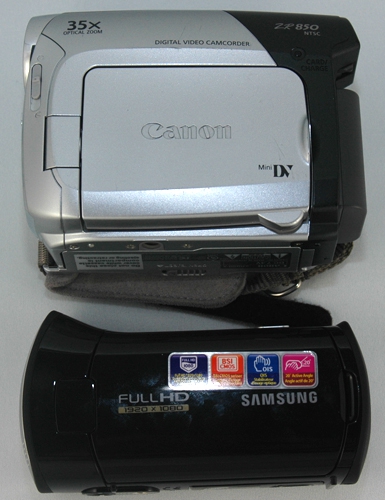
Figure 11: Here's a side-by-side shot which shows the huge difference in physical size. Also notice that the Canon has over 3x the optical zoom range of the Samsung! With batteries, the Samsung is less than half the weight of the Canon and with a 8G memory card, provides approximately the same recording time at higher resolution!
Figure 12: In this front-on comparison shot, you can see how much more bulk the mini-DV cameras represent. This is not necessarily all bad as the extra mass helps to stablize the handlheld use of the camera.
Speed of Zoom
I tend to use the telephoto zoom feature of my camera sparingly (and slowly) when I'm shooting, recognizing that viewers might find sudden changes rather jarring. But some other reviewers I spoke to thought that knowing how quickly the camera could move from wide to telephoto would be useful for some users. The HMX-T10 provides a 10x optical zoom, which is OK for my needs but not great, and takes about 6 to 7 seconds to go from one end of the zoom spectrum to the other (wide angle to tight). Yes, there is also a 100x digital zoom available but all this does is crop the pixels and I never use it.
Speed of Autofocus
While there are manual focus options available on the T10, I think most of our readers will tend to keep the camera in autofocus mode. In reasonable outdoor light, the camera did a pretty good job of keeping up with objects moving at less than 'ludicrous speed', such as a puppy running toward me.
Figure 13: Here's a Youtube version of a sample using the Autofocus with a moving object (The advantage with puppies is you don't need to get signed waivers!). It does an OK job. If you want to see the original full-resolution version straight off the camera, you can find it here (right-click and select Save As).
I also tried some shots at local water polo tournament, but the results weren't as good. It did fine on wide angle shots, but when you tried to get in close, the autofocus couldn't keep up with the changes in subject distance as well. I also tried panning across the front of my house to see how it did with selecting appropriate focal subjects. Optically, the results were fine, but when I played back the results, I was able to hear a slight whirring and clicking which was a bit distracting. It was a very quiet day, so I suspect what I was hearing was the autofocus mechanism in the camera.
Figure 14: I took this shot just outside my house on a particularly quiet day in the cul-de-sac. If you listen closely, you'll hear some clicks and whirs which I'm pretty sure are coming from the camcorder (we don't normally hear that around my house). If you want to see/hear the full resolution version, you can download it here (right-click and select Save As).
Touch Screen
The main interface to the camera's functions is through the touch screen, so I thought it would be useful to show you some of the menu screens provided for setting up the camera. Unfortunately there's no capability for screen capture, other than taking photographs of the screen itself, so I apologize for the imperfections.
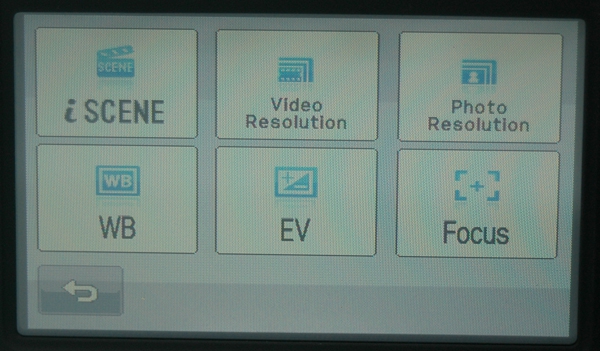
Figure 15: When you press the Quick Menu button, there's not a lot of options available to play with, but these are the ones most people will be familiar with.
Figure 16: iScene is the brand name given to Samsung's automatic everything settings for the camera. While you can have iScene select the appropriate settings for the conditions, there are also options for the usual things we take pictures of -- sports, portraits, indoor settings, candlelit dinners, etc. etc.
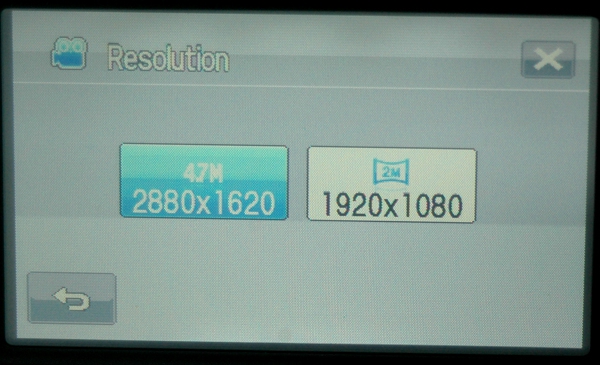
Figure 17: There are only two resolutions available for photo capture; 4 megapixel and 2 megapixel.
Video Capture Quality
All of the example footage I took was at the 1080i resolution with 'Fine' quality. Examples are provided below, but these have been compressed down for YouTube. Generally the results looked good, but I couldn't see them at full HD resolution since I didn't have a mini-HD cable available (available for $30 USD from Samsung, although I found one for $5 USD on Amazon) and the screen on my PC isn't capable of 1920 x 1080.
Figure 18: I took some general movement shots of my puppies running around in the park nearby to provide an example of the camera's video capture. This is the Youtube version. If you want to download and see the full-resolution version, you can grab it here (right-click and select Save As).
Photo (Still) Captures
The really neat feature about taking still photos with the HMX-T10 is that you can do it 'on the fly' while camera is continuing to record live-action video. So now you can capture those special moments as a full 4.7 megapixel JPEG, rather than having to use a frame grab from the video.
Figure 19: Actually, this image looks better than it did in real life! I took this shot at the parking lot of a local paintball field as I was waiting for my son. It's just after dusk and there was very little light available. The camera did a good job of compensating and selecting an appropriate exposure to balance light and shutter speed.
Figure 20: Here's a macro shot, taken on automatic settings with the camera about 6 inches from the subject on a cloudy, winter day. Notice that the autofocus picked a subject directly in front of the camera and that the depth of field is somewhat shallow. But the colour balance is accurrate.
Audio Quality
As you could see from the shot of the front, the camera includes stereo microphones to record sounds as well as the video. The microphones are quite sensitive and have good tonal quality, so the sounds recorded with the video is natural without significant 'booms' or echos. You'll need to be careful in quiet settings however, since in a couple of my tests where the ambient noise was very low, I could distinctly hear faint clicks and whirs as I panned the camera over a scene. I suspect these were the autofocus mechanisms in the camera lens. The User Guide warns that the zoom mechanism may be heard if used in quieter environments.
Battery Life
There are two batteries in the HMX-T10. The first is the main battery which you insert via the bottom of the camera and runs the screen and most of the camera functions, and the second is an internal battery which maintains the clock and settings. The main battery was supplied completely discharged and took about two to three hours to recharge via the wall charger. I suspect it will take about double that if you charge via the USB connection.
I didn't do any 'extended' recording with the camera, but it seemed to do fine for the two weeks that I was working with it. One thing to note is that simply closing the screen does not shut off the camera but rather puts it in a standy mode with the screen off. This is great if you are simply pausing during breaks in the action, but it can cause the battery to get run down quickly if you forget and put the camera away in this mode.
To actually turn off the unit, you need to press the button on the inside of the screen compartment (see Figure 3). The manual suggests you actually take out the battery and SD card when not using the camera, which seems a bit excessive but that would maximize the battery life. The User Guide also warns that two weeks of non-use of the camera can drain the internal clock battery, necessitating resetting the date/time! If that's really the case, that would be a royal pain, but I didn't see any evidence of that in the two or three weeks working with the T10. I guess the best bet might be to leave the unit plugged into the wall socket when it's not in use...
Judging by the battery compartment location and size (figure 8), I don't think it's likely you'll see any 'extended life' replacement batteries soon.
Memory Usage
As mentioned above, the HMX-T10 stores video directly on the storage card in H.264 format. There are three selectable 'qualities' of format -- Superfine, Fine and Normal -- and since these don't seem to relate to the actual resolution of the video image, I'm guessing it has something to do with the compression algorithms applied. On an 8Gb card, you get about 60mins of recording in 'superfine' mode; about 75 mins in 'fine' and about 95 mins in 'normal'.
You can view any of the video or still pictures stored on the card by going into play mode. Here, the camera provides thumbnails of the video segments captured (as defined by the start/stop of the record button) or of the individual still photos. Selecting any one of them starts the play/display. It's also possible to get a slide show of your still photos.
PC Software
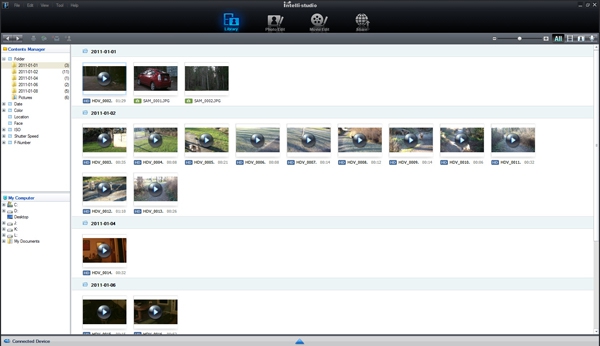
When the T10 is attached to a PC via the USB cord, it automatically downloads and starts the Samsung 'IntelliStudio' application which provides viewing, transfer and simple editing of your video and still photos. As I've seen with other image management software, it attempts to be a one-stop shop for all the image media on your PC, and trolls the entire unit looking for stuff.
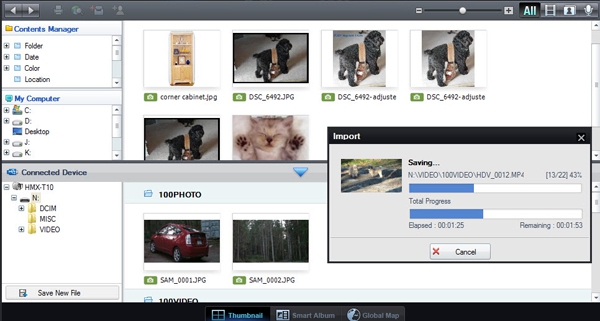
Figure 21: Here's a shot of Samsung's Intelli-Studio 2.0 application as it uploads the video and still photo content from the camera. The upload didn't take long at all, and as you can see from the top half of the screen shot, it is attempting to integrate with all the other image material on my desktop.
For those who have other image management software they prefer, the T10's storage card is also identified as a storage device to Windows 7, so you can simply drag and drop video and photo files wherever you want.
Figure 22: After the upload is finished, you can select whether you want to see just video, photos, or a combination of both. There's also a simple video editor included, which will let you do some simple editing of each video segment, then combine them together with simple transitions into a longer movie.
Conclusion
As you can tell from the article, I was mightly impressed with the HMX-10 from a portability point-of-view, and the simple controls make it a perfect companion for capturing family memories. It did a particularly good job with low light levels. And having it record directly into H.264 format is a bonus. Would I use it for wedding videos or other semi-professional requirements? Probably not, but that's not what it's designed for. I wish it had come with the mini-HDMI cord so I could truly see what the HD output looked like (I couldn't really get a good feel for it from my computer screen), and I'm hoping that Samsung can do something about the noise from the auto-focus/zoom motors. It was also cool being able to take still photos 'on the fly' and see some pretty reasonable results.
Don is a Solution Architect for Fujitsu Consulting, specializing in Enterprise Mobility, Security and Privacy. Two new Havanese/Poodle puppies provide lots of opportunities for him to spend time with the family outdoors, capturing memories to share (bore?) with friends and other family members!
Do you enjoy using new hardware, software and accessories, then sharing your experience with others? Then join us on the Thoughts Media Review Team! We're looking for individuals who find it fun to test new gear and give their honest opinions about the experience. It's a volunteer role with some great perks. Interested? Then click here for more information.


 Threaded Mode